
A Great Way to Settle Disputes...

...the old fashioned way!
Mead Price is a free offering from Slingshot issue 347, July / August 2023. The author is James Morris ["JM" henceforth] who maintains a website and blog HERE. The rules are part of his brief but informative article "Getting Started in Early Medieval Wargaming". It is *definitely* worth reading if you want to...get started in Early Medieval wargaming! At the article's end, JM suggests several popular and accessible sets of rules for the period, along with his own, Mead Price. In the article, he calls it "a very simple set of battle rules" which we can take as a design statement. However, I was able to contact him to get a little more information:
SttS: Did you have specific design goals you wanted to meet with Mead Price?
JM: Well, the whole game was put together over the space of a couple of weeks for the Sutton Hoo 'Wargaming the Age of the Anglo-Saxons' event, so it wasn't quite as detailed a process as you might imagine. Midgard Heroic Battles had the right ethos but I wanted to be able to distil some of that down into a 30-minute game.
SttS: How did you choose its mechanics? Were you inspired by other games?
JM: Simplicity was the key aim. The mechanisms needed to be quickly picked up by people of all ages playing their first game, but to have some kind of plausibility. I'm a big fan of Daniel Mersey's work and had recently played Age of Penda, which was quick to play but felt a little too abstract for a non-gamer audience. The 'highest roll wins' mechanism was probably inspired by Rick Priestley's original Middle-earth Strategy Battle Game, but I have changed how you deal with ties. Other rules, such as the Risk to Heroes and Reputation Goblet came straight out of Midgard Heroic Battles. The random event chit appears in many Too Fat Lardies games.
JM also indicates that it is a simplified version of a full set of rules for heroic battles in the early medieval period, which will be called Midgard. This is due for release soon, in late November, 2024. Even now it has informative videos [CLICK] and explanations at his website.
One thing missing from the article that is brought out in the rules, is the importance of leaders / heroes / bully-boys in the Early Medieval period; sometimes they were the main or only reason there was a battle being fought at all. They also fought amidst their closest and most trusted warriors, often referred to as hearth guards or similar. These men tended to have the best weapons and armor, and the most experience. More on this shortly.
BLUF, aka "Bottom Line Up Front"
Mead Price achieves the design goal of "a simple battle game" and is a superior free offering in a magazine that regularly gives them to subscribers. It presents significant aspects of period battles in the barbarian realms north and west of the Mediterranean in a clear fashion. These include:
- the importance of leaders and a battle line,
- four troop types: Hearth Guard, Warriors, Mounted Warriors, Skirmishers,
- Events beyond the general's control,
all in a modest 2-page package. It is worth the price of issue 347, so one can consider the rest of the issue a bonus!
Problems. The brevity of the rules comes at the price of some unclear game mechanics that could have used more explanation. For example, the mechanic of Turning is not explained, and it is one of the most important mechanics in any battle line game. So, can you wheel? turn on center? Turn freely within the limit of your move? About face? It's not stated. As he included contact info, I reached out to JM with my questions and got the following:
- A Turn takes up an entire Move, and no corner may move farther than one ST.
- If the final Unit of a Leader's command is destroyed, the Leader is destroyed, also.
- A Fight is resolved at the end of a Unit's Move, before the next Unit Activation.
- The ZOC effect is only straight forwards [basically, it's charge zone].
- a tie between two units in combat results in them separating half a ST.
- [EDIT Nov4, 2024] During Fight resolution, if one Unit runs out of dice during the tie-breaking, it loses to any value of the opposing Unit's next highest dice. Example: If the total dice of two units were 2 & 4, and they tied their two highest numbers at 6-5, 6-5-2-1, the '2' would win for the Unit with more dice as the other has a '0'.
- There is no mechanic called "battle rating" [top of p.9]; it should read "strength".
Tactics. Most of the tactical decisions are during setup, which is strict but the order in which players setup has no rules. Alternating Unit placement or drawing a sketch should suffice. Generally, you advance straight ahead to defeat the unit in front of yours; hopefully, combat results present opportunities to flank an enemy Unit or two. If combat goes badly, you will be trying to rescue a couple of your units from being flanked! Around that time, a few final decisive combats will occur and the game will decisively end.
The decisive ending is provided by a Morale Clock mechanic: each side has 8 Reputation Points, and the loss of Units and Leaders - and sometimes Events - lowers it until one side reaches zero when the game immediately ends.
Time Commitment. This game requires little tracking or record-keeping, and should play in an hour as presented, a bit more or less perhaps depending on dice rolling. The game length is easily changed by increasing or decreasing Reputation Points.
Key Game Mechanics
Scale and Time. None are offered, but table distances are measured in "Spear Throws" equal to the width of a Unit and the distance a foot unit moves in a turn.
Taking an actual javelin throw as about 50 yards; bows shoot twice as far or 100 yards. This makes a turn equal to about a minute of activity, plus about 4 minutes of wasted time using voice, visual or musical commands, so a five-minute Turn, give or take.
The battle space as presented in the rules is 8 ST by 5 ST, so 400 by 250 yards. A Unit is 50y wide, so if the common four-man deep formation is used, a Warrior Unit is 50 men by 4 men or 200 men. Four deep seems to offer enough solidity while providing some flexibility to match the opponent's frontage. A Unit of Skirmishers or Mounted Warriors would be around 50-75 men, altho the "civilized" Mediterranean formations would have denser numbers in their Units.
All the above demonstrates one thing - you may say "this game has no specific time and ground scale" all you want, you game designers, but it's there and easily deduced!
Turn Sequence is simple - all Units are assigned to a Leader who has a chit in a bag. The Units Activate when their Leader's chit is drawn. One chit is also the Event chit - if drawn you roll a d6 for a random Event to occur. So there is only the one phase, "Activations" after you set up.
Activation
The draw-chit provides an unpredictable but smooth activation sequence. It is possible for Units to get two Activations before nearby opposing Units if it Activates after them on one turn, and before them on the next. As both sides fight in Melee, this does not affect it much, but it definitely empowers maneuver and shooting, e.g. you may get to shoot or move twice before your opponent can react. Activation choices are Shoot/Move or Move/Shoot [for Mounted Warriors or Skirmishers with missile weapons], or Move; Units Fight immediately if the Move results in contact with enemy Units.
Combat
This is quite simply adding up the Unit's Strength Points and any Leader, Support or Flank bonus and rolling that many dice; whichever side rolls higher wins. Ties result in a "push". Shooting is similar, but only one die for the shooter and full dice for the target, resulting in shooting being weak, suitable for most Dark Ages armies in the uncivilized lands - may not be for Mediterranean civilized armies.
The Importance of Leaders is shown by Units Activating when their Leader's chit is drawn, Leader's significant combat power [1-2 dice], and the effect when killed, [1-2 Reputation points lost]. They are thus as valuable as most Units. Their vulnerability is seen in the mechanic to check for Risk to Heroes whenever the Unit is a target of combat.
Troop Types
These are enough to provide some variety and they all have importance in the game. Warriors are the typical unit and have Strength 2 - so two dice Fighting and two Hits to remove them. Hearth Guard are same but Strength 3. Mounted Warriors are the same but move twice as far and might shoot javelins or bows [bows shoot twice as far]. Skirmishers are Strength 1 and also might shoot. There are no Terrain rules, so Skirmishers are mainly weak Warrior Units that may shoot.
Events
The events are flavorful and usually impactful, although there are a few circumstances where they have no effect which is a let-down. The six are randomly diced for when the Event chit is drawn, and affect Reputation, Leader Risk, Combat, Move, or Rally a Hit. This is a flavorful mechanic, and it may be easily altered to suit a narrative or specific historical / fantastical period, including an RPG or board game.
With this explanation in mind, it's time to see how it plays!
When this free offering came with my Slingshot [always a welcome arrival in its old-school airmail envelope!], I immediately played it several times with Battleground Fantasy cards, Wood Elves vs. Orcs, as I was pressed for time and table space. It provided a quick and narrative game very suitable for the period and the "genre" of literature that inspires it, especially high fantasy literature, e.g. Tolkein and Mary Stewart.
As Units are simple rectangles with no figure adjustment or maneuvering, any labeled card or block may be used for Mead Price. A portable set could easily be made for the game using cardstock and visuals downloaded from Wargame Vault. Also Battleground Fantasy has 2-dimensional terrain sets perfect for people on the go, whether a work or leisure trip.
I set up 12 of my 25mm "mass army" unit bases, single bases 5" x 2.5". The general idea is Dark Ages Britain, seen here:

I then dragged out some runes I bought for gaming purposes. To have some narrative fun, I picked a name to match each Leader and his rune. So below are "F" for Finnbogi, "R" for Rolff, and "Th" for Thrassi, Northumbrians defending their crops against raiders from Strathclyde.

Finnbogi is the Warlord [2 dice, 2 Reputation] and has a command of well armed and armored Hearth Guard and Skirmishers with bows.

Old Glory Swabians and Gothic Archers.
Rolff has a command of two Warrior Units.

Old Glory Gothic Infantry.
Thrassi has a command of two Warrior Units.

Old Glory Lesser Saxon Fyrd.
Below are Strathclyde raiders, "H" for Hals, "S" for Skeggi, "D" for The Druid, a savage bard summoned from his hut near a haunted barrow.

Hals is the Warlord [2 dice, 2 Reputation] has units of Hearth Guard and Warriors.

Old Glory Dark Ages Welsh, Gripping Beast Late Romans / Arthurians.
Skeggi has two Units of Warriors.

Old Glory Medieval Welsh.
The Druid has a Unit of Skirmisher bows and Mounted Warriors.

Old Glory Irish Cavalry and Medieval Welsh Archers.
Hals the warlord of the Strathclyde raiders camped for the night near some Roman ruins, setting some Warriors and Skeggi as an advance guard on a low hill. The Druid is a bit off on the right... he makes the men uneasy...always seems to be toying with unidentifiable entrails and mumbling to himself...Carts with their ill-gotten gains are slowing them down and Hals reckons that the Northumbrians may catch up to them, so is mostly prepared for a fight.
Below, Turn 1, Finnbogi then Thrassi Activate their Units.
 Finnbogi's bowmen give the Welsh a volley, influcting a Strength loss!

Farther into Turn 1, The Druid and Thrassi are engaging in typical pre-battle conversation:

Finnbogi's attacking Northumbrian force has Finnbogi on the left, with Rolff in center and Thrassi on the right.


"I heard you wanted to see your uncle, so we decided to head this way."
"I'm going to gut you like a trout and pull out your entrails!"
"With which I will tell your terrible future!"
War used to be a much more personal past time...

On the left, Rolff and Skeggi engage in similar banter:

"I'm going to feed your eyes to my goats!"
"Then your relations will at last have some foresight!"

Turn 2, another shot from the bows results in a miss...had they succeeded, the Welsh spearmen would have been destroyed. But help is on the way from the Hearth Guard!

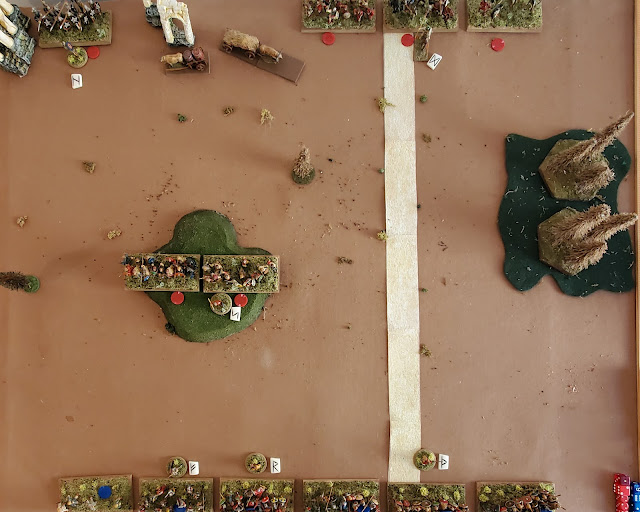
Below, the situation end of Turn 2: The Red raiders are moving up to help their forces on the hill, but are a bit disjointed. The Blue Northumbrians are approaching in a nice even battle line, except that the right-most Warriors are maneuvering towards the hill as a reinforcement.

The order of chits nearly spells "friends"... wonder if "FRHTHDS" is Anglo-Saxon? Anyway, too late for an amicable settlement here!

The chit draws on Turn 3 favored The Druid as he had an opportunity to push back the Warriors ahead of him, which would have blocked the Warriors behind maneuvering to the center. He immediately attacks!
 Unfortunately, he loses, and Thrassi advances after combat to be certain of the space behind him. For that reason, he also doesn't attack the Mounted Warriors - if he lost, he'd have to retreat back into the path of his maneuvering Warriors.

Over in the center, Rolff is throwing his Warriors against Skeggi's Warriors on the hill. To his right, his other unit is not attacking but instead supporting him with a bonus combat die and maintaining the battle line.
 Unfortunately, Rolff is edged out in the combat dice rolls, 4-3...
 ...and retreats back down the hill.

The Event chit is drawn, and a '1' results in a Reputation loss for the next Leader whose chit is drawn due to a Bad Omen - it is Finnbogi.
 Aside from that set back from "ill omens", Finnbogi is doing well, and has driven the Welshmen back off the Hill.

An idea of what the chit draws look like, end of Turn 3.
 End of Turn 3, the Northumbrians seem to be making progress against the hill, and also with maneuvering a Unit of Warriors from the right flank to the center, where they'll be a lot more useful. The raiders are holding their own, but have lost a couple of combats and appear to be vulnerable.

Turn 4 begins with Finnbogi and his Hearth Guard destroying the Welsh Unit on the hill. They have a couple of options, any of which could make the situation even more difficult for the Strathclyde force.
 Over on the right, Thrassi gives The Druid a sound thrashing! His Mounted Warriors depart the field but The Druid survives and moves over to his archers.

The Northumbrian juggernaut seems unstoppable, and they charge to clean up the hill. Victory seems certain when Rolff rolls 6-6-5 for his attack dice. But Skeggi diggs deep, and tie him 6-6-5 [and even had a '5' to spare!], pushing Rolff back down the hill again.
 Desperate for results, Rolff attacks with his other unit, but they lose and are pushed back. Rolff seems to be the weak link in an otherwise successful team!

The Event chit is drawn. Die roll of '2' results in the next Leader drawn having to "Look out for that arrow!" and roll a Risk check - he passes with the '3'.
 The brilliant thing about the "Event" chit is that it easily inserts into the game the many possibilities that do happen in these battles, along with Narrative possibilities [like "Frodo puts on the ring" etc] without bogging the game down in complex mechanics. Some gamers will dislike the randomness affecting their plans and their play, but this is part of the pendulum swing of "history / reality" v. "game / chess". Depends on your preferences for games, but it empowers the narrative, and I like that a lot in certain genres like Medievals and all skirmish games.


The order of chits nearly spells "friends"... wonder if "FRHTHDS" is Anglo-Saxon? Anyway, too late for an amicable settlement here!


Turn 4 ends with Strathclyde having lost two Warrior Units and having only 4/8 of their Reputation points left, v. 7/8 for the Northumbrians, who only lost a Reputation point due to a Dark Omen. The pressure is on the raiders!

Turn 5, first draw is Hals, who has a clear flank attack on his opposing colleague Finnbogi! It seems that his coverage of the Warriors on the hill will pay off...

The teulu crash into the Hearthweru, and Hals and Finnbogi square off:


"There can be only One, Sassenach dog!"
"One what? What are you talking about? Strathclydian snake!"
Unfortunately, despite clever banter and film reference, Hals loses the fight rolls, a strength point, and retreats. Finnbogi doesn't pursue him, being focusing on a victory at the hill instead of getting bogged down with a strong unit.

In the center, Rolff makes another strong attack against Skeggi on the hill. With a high of '5' he loses the roll-off 5-4 on the second dice, and his Warriors flee the field. He now has to roll for Risk twice...
 ...and passes on double-4s, so is placed with his other Unit.
 Unfortunately, Rolff loses again on an even attack on the center Strathclyde Unit, and departs the field with the last unit of his command...
 ...Rolff can only roar in frustration one last time.


With the loss of Rolff and his entire command, which is 5 Reputation, the Northumbrians are suddenly at 2/8 of their Reputation points - the battle has turned!
Eager to put the last nail into the Northumbrian coffin, Skeggi charges off the hill into Thrassi's Fyrd Unit, winning the fight 6-5! This ended Turn 5.

 I rolled the Black Die of Fate and the '6' meant that the next Leader drawn would get 2 extra dice in combat. Trembling with anticipation I draw a chit and it was Skeggi! He totaled up 6 dice for combat: 2 from the Unit, 1 from him, 1 for support, and 2 from the Event. The fyrd had one measly die but rolled a '5'! I rolled the dice for Skeggi one by one...the first few were below 5...but finally a '6' was rolled, and he won the combat 6-5! On a 5-5, he would have tied and the game would have continued.

I was full of tension as Turn 6 began, as the chit draws would be very important here: if Hals' chit was drawn before Skeggi, he might be able to charge into the rear of his Warriors. If Skeggi was drawn first, he could charge Thrassi's fyrd unit, finish it off, and end the game! And the first chit drawn was...an Event!


With the loss of the fyrd, the Northumbrians lost two more Reputation points and went to zero. GAME OVER, MAN, GAME OVER!! Shout the victorious Strathclydian force!


Exciting time, and a good narrative as well. Mead Price would definitely make a great vehicle for a campaign, or as a combat resolution for a board game like The Saxon Shore is Burning available from the Society of Ancients, or the solo game Vikings: Scourge of the North by Decision Games. No doubt there are many others, and welcome additional suggestions in the comments below.
Overall, I found my playtesting to be flavorful and evocative of the period without being bogged down in game mechanics that presented me with:
- false differentiations, especially in the area of weapons / armor
- trivial details, "is it a stone wall or a wood fence?"
- over-engineered game mechanics, "you pro-rate the unit's move into the woods"
- gamey / cheesy manipulations, "You can't
- a pile of irreconcilable special rules.
I felt like after several playtests I could probably fight these battles with a couple of beers in me, just like the real leaders, and unless one side makes a serious mistake the game would likely be decided by the Norns through the Events and dice. And if the players are equal in skill and execution, I'm fine with the dice deciding!
All key aspects of Mead Price are easily modified to suit the period and narrative in which you are playing, as the mechanics have distinct [moments] in the rules that helps prevent undesirable secondary effects caused by the modifications. This is greatly aided by the use of the draw bag Activation Sequence. So the cautionary word is that one should restrict "tweaking" to distinct, contained changes.
For example, if one were to modify the Events Table for Hastings 1066, then some events might not be suitable for Saxons firm atop a hill. Instead, one might change one to "all Units of the next Saxon Leader drawn this Turn advance 2ST off the hill". Or perhaps one is playing in Tolkein's world; the event might read "2 random adjacent Units of the next Orc Leader drawn this Turn may not move, as a quarrel breaks out. between two different tribes"
Some tweaks that I will be working on:
- Dropping the ZOC rule, aka "Barkering" - it's not needed.
- Terrain Rules: Only Skirmishers may enter area terrain that is Rough, e.g. Woods, Bogs, Rocky Ground, etc.
- Turning:
- 180° "About Face" costs a full ST, except a 1/2 ST for Skirmishers.
- Otherwise, Units Turn freely by any combination of wheeling or rotating; however, no corner may move more than 1/2 ST, except Skirmishers corners up to a full ST.
- Shot Limit: Somewhere between 3-5 would be reasonable for most Units. More if the army is missile dependent or highly organized, e.g. Byzantines or Elves.
- Standing Shot: If Bows do not move, they shoot with 2 dice not 1.
But it is also possible that a more fleshed-out official version is forthcoming.
Regarding a future for Mead Price as its own ruleset:
JM: I am considering doing an expanded version at some point with diagrams, examples, scenarios and army lists, but I need to get Midgard out of the door first.
And we can certainly sympathize with that - it is unfortunately true that real life often gets in the way of important things like wargaming! 😄
Hope you enjoyed reading this as I have enjoyed playtesting and presenting it. LMK if you want to see some more reviews and battle reports on what appears to be the "growing family" of Mead Price and Midgard rules!
No comments:
Post a Comment
Thanks for your comment! t will be posted after it's moderated.