Saturday, January 24, 2015

NT Dark Ages Rules - 1 Hour Update!

EDIT - I have put in a cleaner version now after a few more reads - 01/31/15
OK, so this is where I am with my development of the rules.  I will be giving these a playtest in the next few days.  I've revised the draft several times, always seeking to simplify and stay in touch with the original rules style and intent.  Some will notice that despite declaring the personality rules I used fine, I scaled them back a bit more after I did the math.  Sorry the formatting of the bullets went haywire - I'll correct that later.

Any feedback welcomed!
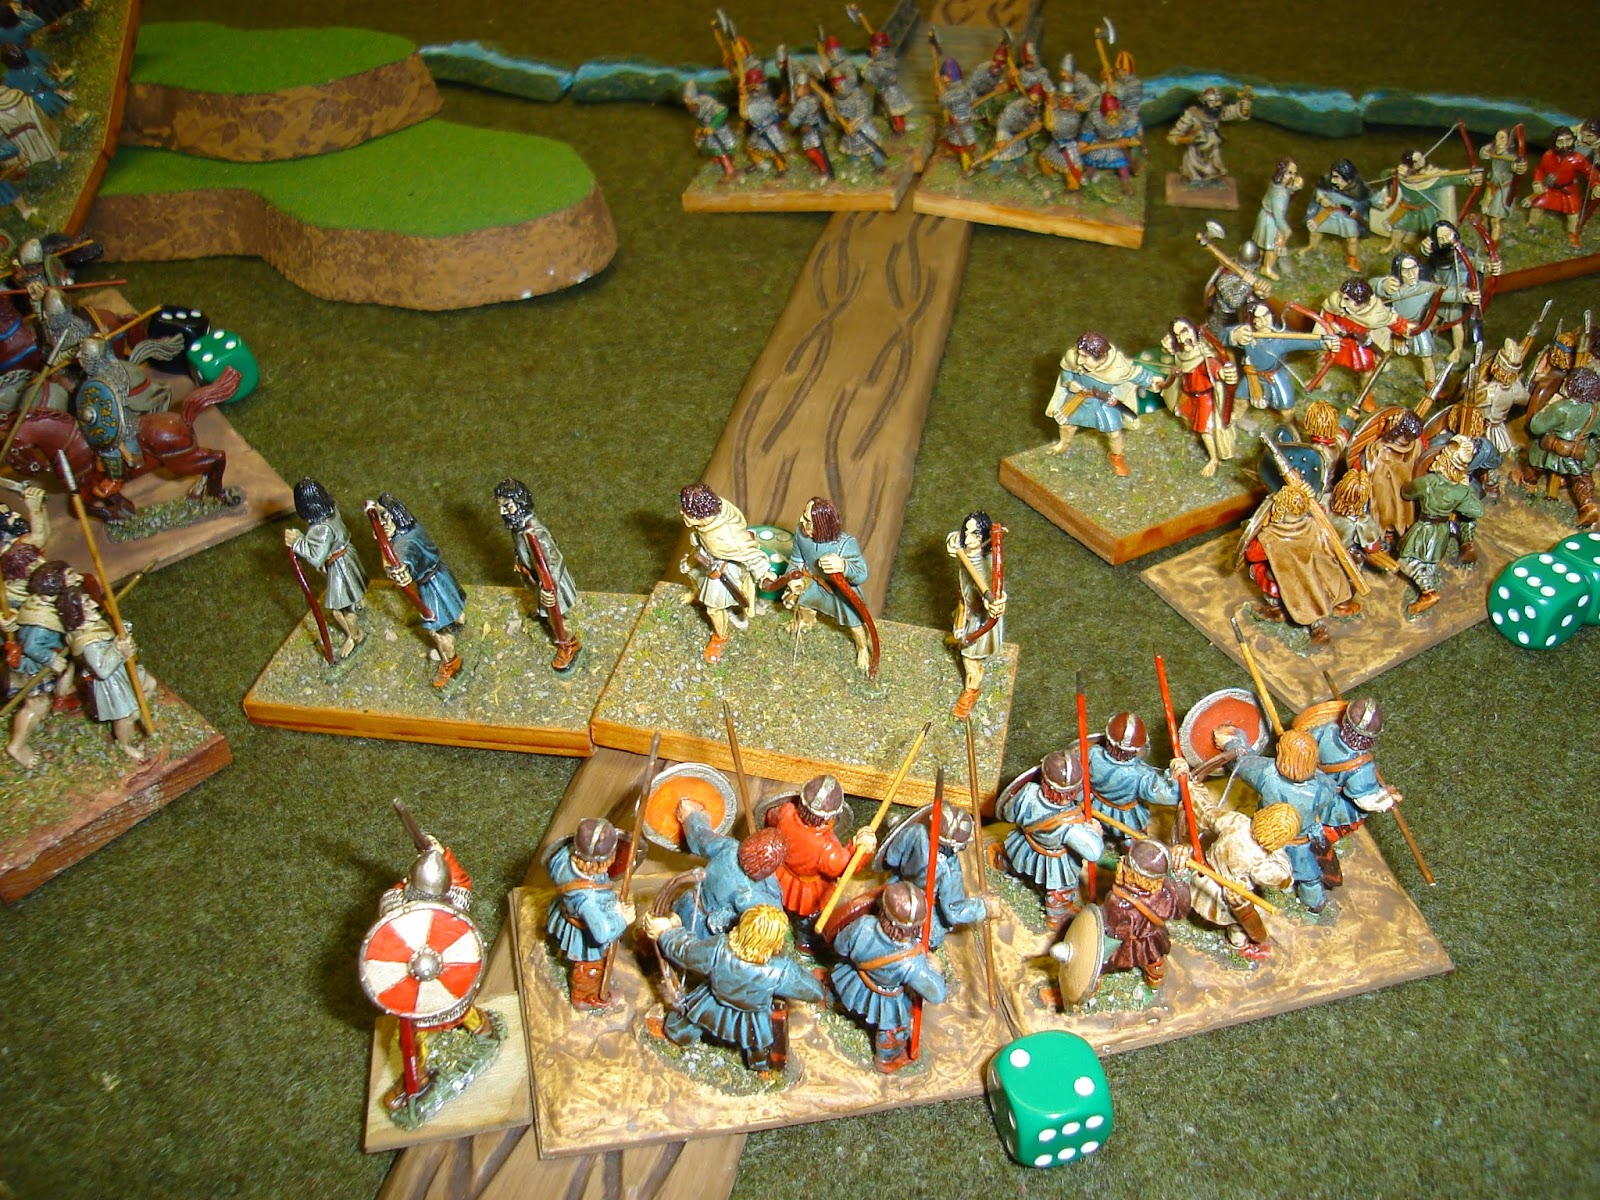
DARK AGE WARGAME RULES

Units
There are four types of Units in the Dark Ages rules, representing British types.
1.    Infantry are assumed to have some training and experience working as a Unit and adopting the protective shieldwall formation quickly and at need.  Due to this defensive posture, they move slower and more deliberately than other Units.  They may have large shields and small spears such as Romanized British, or small shields and long spears such as the Picts.
2.    Warband are aggressive individual warriors, attacking with speed and ferocity.  Their lack of armor and wild, disorganized fighting style leaves them vulnerable to casualties, however.
3.    Cavalry represent household soldiers on small unarmored horses who use their mobility to hurl missiles with impunity until the enemy is weakened, then charge in to finish them off.  As professionals, some may have armor and helmets and be eager to charge into melee.
4.    Skirmishers are hunters/raiders with bows & knives, or javelin-armed freemen with small shields and long knives.  They harass with missiles, charging if they see an advantage.

Figures & Basing
4-6 inch frontage per Unit with no prescribed depth, figure size or number per base.  Mine are two adjacent 6cm bases of 2-6 figures [WRG standard], for a total of 12cm [<5 ”] or 5 bases of 2x1” cavalry singles.  The bases may follow one another through gaps or along roads as needed. 

Line of Sight
LoS is measured from a Unit's front center point to closest visible part of target.  It is blocked by any intervening Units, hills, woods, buildings, etc. that are scaled to figure height or higher.  
·         Units may see into and out of woods, but not through two sides of a wood. 
·         Units must have LoS to shoot or charge enemy Units at the time of the shooting or charge.

Play Sequence
A full turn has each player taking four phases:
Attacker [player A]:  1) Movement, 2) Shooting, 3) Melee, 4) Eliminating Units
Defender [player D]: 1) Movement, 2) Shooting, 3) Melee, 4) Eliminating Units

1) MOVEMENT
Playser sequentially move their Units, with no corner exceeding the total distance rolled in inches. 
Class 1.    Infantry                                  move 1d6+1
Class 2.  Warband & Skirmishers          move 2d6+2
Class 3.  Cavalry                                    move 3d6+3
To fit through a gap or move along a road, the two bases may be placed one behind the other, or the cavalry bases may move sideways or in a column of bases for appearances sake.

Moving Shots
Instead of waiting for the Shooting Phase, Units with javelins may perform a Moving Shot in their Movement Phase, either before or at the end of their move.  Bows may not shoot if they moved.

Terrain
There are two terrain types, Linear and Area.  Linear are 6-12” long x 1-3” wide.  Area are 6-12” per side or diameter.  Building or tree models are only decorative – move as needed to position Units.
·         Villages.  Area. No effect on movement.
·         Woods.  Area. Only Skirmishers may enter.
·         Marsh, Lakes.  Area. Impassible.
·         Rivers.  Linear. Any Unit may cross at a bridge, a ford, or in shallows.
·         Roads. Linear. Units get a 3” bonus moving entirely along a road and not Charging.

Turning
Units Turn by pivoting on the center front, up to 180°.  Units Turn as follows:
1.    Warband & infantry may Turn once, at the start or end of their move.
2.    Skirmishers & Cavalry may Turn twice, once at the start and once at the end of their move.
3.    Any Unit in melee contact with enemy Units that are not on its front facing may face one of the Units.  It turns a full 90° or 180° and bases of enemy Units are adjusted to maintain contacts. 

Charging
Charge moves end with the Unit in Contact with an enemy Unit.
1.    The target Unit must be within 45° of the charging Unit’s front and in its LoS to be charged.
2.    Contacting the flank or rear is only possible if the entire charging Unit is past an imaginary line drawn along the Target Unit’s side or rear respectively.
3.    Contact may be made by only one attacking Unit per facing; front, rear and either flank.
4.    Contact is made by moving along the shortest line from the Charging Unit center to the center of a facing that is not already in a contact, maximizing the amount of edge to edge Contact, if any, and minimizing any gap using all available movement to do so.  It then stops moving.  
There is no additional free movement to achieve full edge to edge contact [the so-called “closing the door” of DBA and other rules].   Any gaps are assumed to be filled with fighting men!

2) SHOOTING
·         Skirmishers and Cavalry may shoot at a single Target within 45° of their front facing, to which they have a clear Line of Sight of an entire Facing.
·         Bows may not shoot if they moved during the Movement Phase.
·         Javelins may not shoot if they performed a Moving Shot in the Movement Phase.
·         Fulfilling the above restrictions, they may even shoot into a melee.
·         The range is 12” for bows and 6” for javelins. 
·         Roll 1D6 and subtract 2 if the Unit is armed with bows, or 1 if armed with javelins.  This gives the number of Hits against the Target Unit, modified as follows:
o   Terrain.  Units in Woods or villages halve Hits [round up].
o   Shieldwall.  Infantry Units are assumed to assume a Shieldwall formation against any threat, so they halve Hits [round up] from shooting at their front or flank facings.
o   Unshielded or unprepared. Double Hits from Units shooting at the rear Facing.
·         Both bows and javelins are limited to three shots.


3) MELEE
One-Sided Melee.  Units only inflict casualties during their own player turn.
Roll 1D6 for the Unit, giving +2 for Warband, -2 for bow Skirmishers, -1 for javelin Skirmishers and -1 for Cavalry.  The final result is the Hits against the Target Unit, modified as follows:
·         Terrain. Units defending woods, uphill, or a river crossing, halve Hits [round up].
·         Shieldwall. Infantry Units halve Hits [rounded up].
·         Unshielded or Unprepared.  Double Hits by Units attacking on the flank or rear facing.
There is no dividing of the Hits a Unit inflicts upon multiple Units attacking it [one enemy Unit may attack each facing; front, rear and either flank, so four total Units].  So, Units only fight melee combats to their Front, attacking a single enemy Unit if in contact with their Front Facing.  Melee concludes with the elimination of one of the sides, but Units in melee may turn to face attackers [see movement].

4) ELIMINATING UNITS
Any Unit with 15 or more Hits is removed from the table.

OPTIONAL RULES

PERSONALITIES
These come in several types to give an army some more “personality”.  For every three Units in a force, a player may pick a suitable personality figure.  All personalities function as a Unit upgrade that may transfer to another Unit within 6” at the start of the friendly Movement Phase.  If in a Unit that is in melee they may not leave it, sharing its fate if destroyed.
·         Hero.  This is a warrior with personal fighting skill, or frenzied pagan shaman.  Inspiring others with their skill and eagerness, Heroes give a +1 bonus in shooting or melee combat.
·         Leader.  This is a campaign veteran, such as a Roman Centurion.  He knows that maneuver will win the battle more often than personal valor, and demands discipline from his men.  A Leader gives a Unit one additional Turn that may be used at any time during its movement.
o   Banner.  This is an upgrade to either personality above.  The Banner is a prestigious symbol of the personality and his people.  It allows a Unit that is not in Melee, and has not moved or shot, to rally off 1-3 Hits [halve a d6 roll, rounding up].  A Banner counts as one of the permitted Personalities for the side.
·         A Christian Priest rallies off 2-4 Hits [halve a d6 roll, rounding up, then add 1] since he has a suitable holy relic, standard, great exhortations, etc.

INITIATIVE
Battles often began with one side as the aggressor, making a series of attacks until fatigue or enemy resistance caused them to lose momentum.  To simulate this, the scenario attacker has Initiative and goes first each Turn [if no clear Attacker, roll off].  But at the start of Turn 2 - and every Turn after - roll off adding +3 for the Initiative Side.  If the Initiative side loses the roll, Initiative changes to the other side and they start going first each Turn.  Note this allows the side seizing Initiative to go twice in a row as the turn order changes, which could be a critical moment in a game.  While it is possible for Initiative to switch a couple of times, it is likely to only change once.  Additional options:
·         For more likelihood to change use +2 for the side holding Initiative, for less go with +4.
·         Subtract '1' from the Initiative player’s dice roll for each of their Units that have routed.

VARIABLE QUALITY
For each army of six Units, allow one Unit to be Elite, but one must be Levy to balance things out!
Elite / Stubborn troops = 18 Casualties before routing.
Levy /Nervous troops etc = 12 Casualties then routing.

FORCE MORALE
The 1HW scenarios have 6 Units per side as the norm.  This conveniently comes to rolling a d6 each time a friendly Unit is destroyed, attempting to roll higher than the total number of friendly Units destroyed to keeping fighting - if you roll equal or less your force routs and the game ends.  With three Units, roll a d3, with four d3+1.  As this shortens the game a lot, you can roll TWO d6 and keep fighting if EITHER roll beats the number of Units lost or even 3d6 for desperate or stubborn forces.  You could also get a +1 to your roll if your opponent has lots more Units, emboldening your force.

In a campaign game, allow the opposing side to get one last free attack as they rout.  For more "period flavor", consider fun ways to gain a bonus point or two on the die roll, like winning a pre-game challenge, praying to God [or 'the gods'], fatigue from force marching to an objective, etc.

ADDITIONAL UNIT TYPES
Roman Militia.  These are Infantry who melee at d6-1.
Roman Cavalry.  These better equipped cavalry on bigger horses shoot & melee at d6.
Arthur’s Cavalry.  As above, but are Elite.  If “the Knights”, let them fight d6+1.
Mounted Servants. These fight with javelin but at d6-2.  If there is an Elite cavalry Unit in play,
they may also be Elite.  In this case, a second Levy Unit must be taken.
Irish Nobles. These javelin Skirmishers fight at d6.  One Unit may be Elite.
Scots Nobles.  These stubborn Warband fight at d6+1 but are Elite.
Viking VeteransAfter deployment choose to fight as Infantry OR Warband.  One Unit may be Elite.

FALL BACK!
Skirmishers and cavalry may make a full move directly back out of melee to Fall Back [FB]:
·         IF they are from a higher movement class than all enemy Units in the melee
·         AND no enemy are in contact with their rear facing. 
If an enemy Unit is in frontal Contact with the FB Unit, dice-off their movement distances – if it wins the enemy Unit makes a free attack before the Skirmish or Cavalry Unit moves the amount it rolled.

MISSILE SUPPLY
Starting with the second shot, any roll of unmodified 5 or 6 results in the Unit having used the last of their missiles with that shot.  This replaces the three-shot limit.

DECLARED MOVEMENT
The player indicates a Unit, states the intent of its move, rolls the dice and then fulfills the intent as much as possible.  Units move the full distance rolled even if farther than desired.  They may however stop alongside a Unit with a banner, at a terrain feature that gives a movement or combat bonus [e.g. road, hill], and must stop at any Unit they may not interpenetrate, Contacting for Melee if an enemy Unit.  Warband must contact an enemy Unit if they roll enough distance. 
Note, this section is the one most open to disagreements, so use with caution!  A Personality with a Banner suddenly becomes essential if you use this rule.f the movement rolled permits them to do so.

Saturday, January 10, 2015

"One - Hour Wargames" Scenario 5: Bridgehead - Double Battle Report

So on a wet, cold, gloomy afternoon we gathered at the home of a renowned game designer and retired military mastermind to give the "One - Hour Wargames" Dark Ages Rules a playtest with the various clarifications I've figured out.  For optional rules, I used diced movement and for the cavalry a shooting move with a 9" javelin range and three shots before running out.  The light cavalry fought d6-2 like any skirmishers, and the heavier d6-1.  I also used the rules for personalities, with the invaders having two leaders - one with banner, and the defenders two leaders and a priest.  

We replayed scenario #5 but with double-armies of 12 Units each, on a larger board.  This meant some recalculating as I wanted the fight to be in front of the bridge with the defenders fighting _forward_ to keep the bridgehead clear for their use lest it become a barrier for their crossing it.  Fortunately, the two experienced gamers present enjoy some thinking and working a scenario on the fly.

Below is the start.  On the far side of the river are two columns of reinforcements for the Strathclyde Welsh; four units of Welsh Skirmishers [bow] and three Units of Infantry [shieldwall infantry].  Also, two leaders and a priest.

On the near side, are their advance force, two light cavalry and two armored cavalry, all armed with javelins, and a three-shot limit.  This totaled eleven Units, to I forgot one!  Despite this disadvantage, the Strathclyders went to battle with determination.


To the left of the road are the North Welsh warbands, five with a Unit of Skirmishers [javelin].  To the right of the road are four Units of Infantry [shieldwall] and two Units of Skirmishers [bow].  They also have two leaders, one with a banner, a white star on a black field, clearly showing on the left.

View of the invaders from the Strathclyde Welsh side.

End of Turn 1.  The North Welsh advanced, albeit a bit unevenly [unsurprising considering the number of Units and the diced movement rule].  The SW advanced off their hills to meet them, and contest the ground in the valley, playing for time as their reinforcements arrived.  The first Unit is a Skirmisher (bow) coming down the road at right.  Next Turn, the NW continued advancing on the bridge while the SW cavalry played for time, throwing javelins and retreating.

End of Turn 5.  The SW gentry finally arrive, with armor and attitude.  They also have their priest.  Before them, holding the bridgehead, are the Welsh bowmen who raced ahead with the cavalry to give them time to arrive. Three Units hold the bubble around the bridge.  The Saxon greater Fyrd to the right have taken some heavy casualties at 10/15, while all the bowmen have some losses.  An SW armored cav is to the left.  In the foreground, an NW Infantry shieldwall with a leader cuts into the bowmen, a contest that won't last long!

Sam turn, but overall view.  Note the reinforcing Infatnry coming down the road at the right.  Also, you can see the situation of the far left light cavalry - engaged to the front by Skirmishers is all well and good, but the Infantry Unit is going to outflank them soon.  Trying to take on two Units is not easy for light cavalry with their backs to a river!


Turn 6 or 7.  Despite the ferocious, well-developed attack, the SW are holding the bridgehead.  Two Units of Shieldwall Infantry  are at the top, the SW right.  In the center are the armored Teulu, or family, to their left are the remaining bowmen and then the Unit of armored cavalry.  Beyond them is the left-most Light Cavalry that was cut off, and is now being attacked on two sides by Infantry and Skirmishers.

On the next turn or so, several of the SW Units broke, the Teulu in the center being flanked by the Warband btw them and the bowmen.  They'd held the bridge a long time, and we played until their force was wiped out.  The game master [me!] needed to develop a time limit when dark would fall and the NW would have to withdraw.  In the end, I opted for an 8" zone of control around the bridge, and the time limit was about a 7 -8 turns.  I only noticed now in this batrep that I forgot a SW Infantry Unit!  Also, I had the bowmen arrive first, and should probably have alternated bow Units with infantry.

Regardless of the gamemaster's planning deficiencies, both commanders performed well, with the battle in doubt until the very end, and what could have been a victory for either side in a close fight with a "night falls" time limit.

For me, this showed that the rules work well for other experienced players.  While contact and melee connections had to be explained a few times they seemed pretty satisfied overall.  It is a strike against the rules that the definition of a legal melee contact is not provided since it would not have increased the length of the rules much, and a total newbie would be perplexed by the issue.

The Personality rules work just fine as is.  They provided a little impact but not decisive.

The diced movement needs tuning.   While it successfully made movement less predictable, "declaring intent" was a bit clunky at times, and it's hard to decide what intents should be permitted.  For example, should barbarians be allowed to stop at a point to stay in line with one another?  Or would they only be able to recognize the general's banner?  Would they ignore it completely in the adrenalin of the upcoming fight?  These are some decisions the GM has to make for the forces involved.  For this battle's forces, I'd say that the Warband can only stop movement at a banner, or a terrain feature, or contacting an enemy Unit.  The Infantry may stop to  align on a friendly Unit.  That should solve the whole untrained but enthusiastic aspect of these troops.

The javelin throwing needs tuning.  While it worked OK, and it wasn't hard to track ammo, the throwing during movement is not smooth.  First, it violates the turn sequence.  Second, it violates the rule about when to change facing [RAW is at start and end of the move] and I want to stay in tune with NT's rules as much as possible.  The goal is to make cavalry Units hard to catch but keep shooting simple.  There are mechanical difficulties with using NT's solution which is a 12" shot and allowing shooting at the end of movement, but it is the easiest.  It probably will work with just a qualification about targeting and intervening obstacles and LoS.  So I would run with the rules from the Pike and Shot section p.32-33, with my clarifications in italics:

Cavalry and Infantry armed with javelins may shoot at the end of their move. They may shoot at a single target within a 45 degree arc and 12" range.  They must have a clear LoS to a full Facing of the Target Unit, and terrain that hinders or obstructs movement must be over 6" away from them.  They get three shots.

Most importantly, both players fought hard in what was a demanding scenario in a period they don't know well with rules they'd never played, and responded with good tactical planning and only a few very legitimate questions.  I didn't even give them a QRS, which I will next time!

So my thought is that with some playing, and a few decisions on that which was left out of the rules, these play just fine for the Dark Ages in Britain, as is their intent.  If you want to go early Dark Ages and do the Fall of Rome, or Byzantium, then a lot more thinking and planning would be needed but the mechanics and platform are there.

This is still a very good deal for $17 or so, and the thirty scenarios are a huge help!  While I could've done a "let's line up and bash at it" scenario, I opted for a complex and demanding one, which the players enjoyed.

Saturday, January 3, 2015

Neil Thomas "One - Hour Wargames" Battle Report #2: Flank Attack

OK, this is the second Neil Thomas battle report from "One - Hour Wargames".  This is Scenario #7 Flank Attack (2).  As a sequel to the previous battle, the North Welsh having succeeded in crossing the bridge they are now advancing down the main Roman road.  At a gentle pass through which the road cuts, the Strathclyde Welsh have deployed a blocking force.  Unfortunately, the invaders have sent a flanking force around the right and now dawn finds them in position...

This is the second play of the game.  I tried once setting up the defenders farther away but wasn't happy with the play - it was too easy for the defense to hold the hill line and not a close game at all.  The flank attack just resulted in a "divided attack" since the two sides are the same size.  Basically, the attackers need an edge in numbers or position to take on the defense of the hills.  The scenario shows the zones of setup and states the defenders are on the hill facing South, but one can still put them to the West away from the flanking force, or on the back of the hill, etc.  In my deployment, I have tried to respect the idea of the scenario.

Down the center is a stone Roman Road [paper cut-out from Usborne], to the bottom right is an abandoned Roman building and a field growing wild [GW ruins from the LOTR game and cut-up door mat], to left are two styrafoam hills and top is a green felt woods with the same hemlock trees as the last game.  Scattered around is Spanish moss that has no game effect but helps give the table some 3-D character!  Hosts should always be mindful that miniature games should be as appealing to the eye as possible.

Army composition is both sides have six Units.  The invaders five Warband and a Skirmisher [bow].  The defenders have a Cavalry, four Infantry [shieldwalls] and a Skirmish Unit [bow].  As I was playing solo, my job was to continue the narrative begun in the previous game.  I deployed the defenders to block the pass in depth, with two Infantry on the right [pic bottom], one in the center reserve, and one on the left, with the Skirmish Unit on the far left flank covering the woods.  In deeper reserve I put the Cavalry Unit.  This 4-1-1 deployment gave me a strong defensive position that was "objective fullfilling" and blocked the road.  A straight on assault would not work as the uphill advantage gives a defender no shooting advantage but halves melee hits.  For an "Infantry Unit" [using shieldwall by definition] this means casualties against them are quartered.

The canny invaders are quite aware and start the scenario in an outflanking position.  The setup puts them quite close to the defenders unless they "know the surprise" which of course I pretended not to and followed orders to block an attack down the road.

The invading North Welsh have their Skirmishers in the woods acting as the pivot point for the attack, then two Warband as a pinning force while three Warband attack the left flank of the defense.

The rule tweak I used was Dicing for Movement.  Each Unit declares an intended action, then rolls below for the actual movement available, fulfilling the intent as best as it can.
Infantry = 2d6-1
Warband, Skirmishers = 2d6+2
Cavalry 3d6+2
Which average out to  6, 9 and 12" respectively, altho they give the possibility for a roll as low as 1" for Infantry and 14" for Warband, which seemed fine to me given NT's troop type descriptions.

Starting Positions, Below.  
Turn 1 [no pic, sorry!].  The invaders move up quickly in the front to pin the defense while the flankers attack the left Skirmish Unit, hitting it on front and left flank.  The far Unit advances against the Cavalry who reposition themselves while the reserve Infantry shift to the left.

End of Turn 2 Below:  The three flanking Warband routed the Skirmishers on the far left flank but it took two turns due to the hill advantage.  The NW Skirmishers in the woods inflicted  three hits with shooting on the Left Infantry.  This has repositioned itself facing the flankers and getting it's own flank covered by the other two Right Infantry who had to come off the hill to do so.  The cavalry quickly extricated themselves and formed a new reserve as the reserve Infantry takes on one Unit of the flanking invaders.  

My understanding of the weakness of Cavalry against Warband is seen here - I'm hoping to use them to finish off weakened Warband Units.  Note that the goal of the outflanking force has been realized - the defenders have been forced out of their solid positions and are now receiving no terrain advantages.  Feels right thus far!

End of Turn 3: Hard to tell from this angle, but the two left Warbands are fighting the Left Infantry shieldwall.  I think I was experimenting with allowing two Units to fight on the front.  Something I've now decided not to do.  The battle in the center is going the way of the Infantry, as both of the pinning Warband have twice as many casualties.  Warband dish out casualties in this game, but they also have a bit of a glass jaw compared to the Infantry Units which halve casualties against them.

End of Turn 4:  The left Infantry are looking very shaky - but so is the middle Warband.  The fight in the center continues to favor the defenders but it's not time to get overconfident with the left looking so weak.  The cavalry are ready to jump in at a good opportunity...or perhaps flee and save themselves at the first opportunity!

End of Turn 5: One Warband and one Infantry each break on the left [top of pic].  The Right Infantry couldn't seal the deal on the pinning force and left them alive with 3 and 1 casualty points left respectively.  The Cavalry have now been forced to act!

End of Turn 6: Well, the Right broke the attackers pinning them in place.  However, they don't look good with 13/15 and 12/15 hits respectively!  Also unfortunate is that the left Infantry was broken and it is now just the Cavalry holding the entire left of the battle.  And occupying the center is a very strong Warband Unit with just a few Casualties.

End of Turn 7: Well, the cavalry turned in another weak performance.  The entire left is gone while the right tries to stave off inevitable crushing defeat!  However, the Warband are still pretty strong and the Skirmishers leave the safety of the woods to nip at the Infantry with 13/15 hits gone.  The two flank attacking Warband in the pic left are too fresh to be stopped - they can sense victory!

End of Turn 8:  One of the Infantry was broken by the Skirmishers who managed to roll up and compensate for their 1d6-2 combat ability [note this means that on a d6 roll of 1-2 zero hits are inflicted].  The last defender is virtually encircled!  The Warband at the bottom did a long repositioning to attack the flanks / rears of the Infantry if needed - will it be?

End of Turn 9: No, but they did it anyway - bloodthirsty savages!  The defense is routed...

I thought the game played clean enough.  One thing I was trying to use from Kings of War was allowing a second Unit in a front attack.  Unfortunately, this had a cheesey aspect since there's no ZoC rules and one can weasel in two Units on a frontal attack despite a continuous defense.  I therefore returned to the RAW [more humbly, I might add] and now only permit one Unit per facing and requiring two Units to attack together to flank attack.  One must engage the front facing the other the flank/rear facing desired.

The scenario was very reasonable.  While I could've set up the defense farther away from the flank attack, that didn't seem reasonable.  The action would've been closer without the "two Units attacking the front" experiment which is not the scenario's fault.  

Overall, a good game and some new commitment to play RAW until the design is better understood.  The geometry of attack, defense, etc, could've used better definition by NT.

For a play of this scenario in the 7YW, go here:
http://theminiaturespage.com/boards/msg.mv?id=371224