Showing posts with label Neil Thomas. Show all posts

Wednesday, August 9, 2023

History to Table - Creating Hereford 1055 Scenario


How does one take an historical event and put it onto the tabletop?
If we are to call our games "historical" and present them as an even that happened, or may have happened, there are a number of factors to consider in the translation of history to the tabletop game. The game must:
- be based upon plausible history, best as we have it,
- work with our table, time and tiny tin limits,
- be a balanced game, with both sides able to achieve their victory conditions; that being said, the most likely outcome should be the historical one.

In this example, I'm working with the following Limits:
1. Table. I'm keeping it to my 3x4' office table which is just adequate and never needs to be cleaned off for others [as opposed to the dining table!]. 
2. Time. About two hours, start to finish, is doable.

3. Tiny Tin. My 25mm early medieval miniatures are more than enough. Based upon the Table and Time above, I can field 4-6 Units, around 50-60 figures a side.

For the plausible history source material, I turned to the excellent volume by Paul M. Remfry [hereafter "PR"] Medieval Battles Wales 1055-1216 v2p1  
I have found it to consistently assert evidence-based likelihoods, which is usually the best we can get.  There's lots of poorly informed opinions out there, but PR gives such evidence as is available and doesn't over state a case.  I appreciate this restraint on his part, and hope it inspires young archaeologists and historians in the future to answer the many open questions that are lingering.  My copy was not  difficult to obtain from him:
I encourage you to consider his work at his web site [CLICK] if you've any interest in medieval military history. It may not be "the latest hard scholarship", but it is readable and makes a lot of sense!

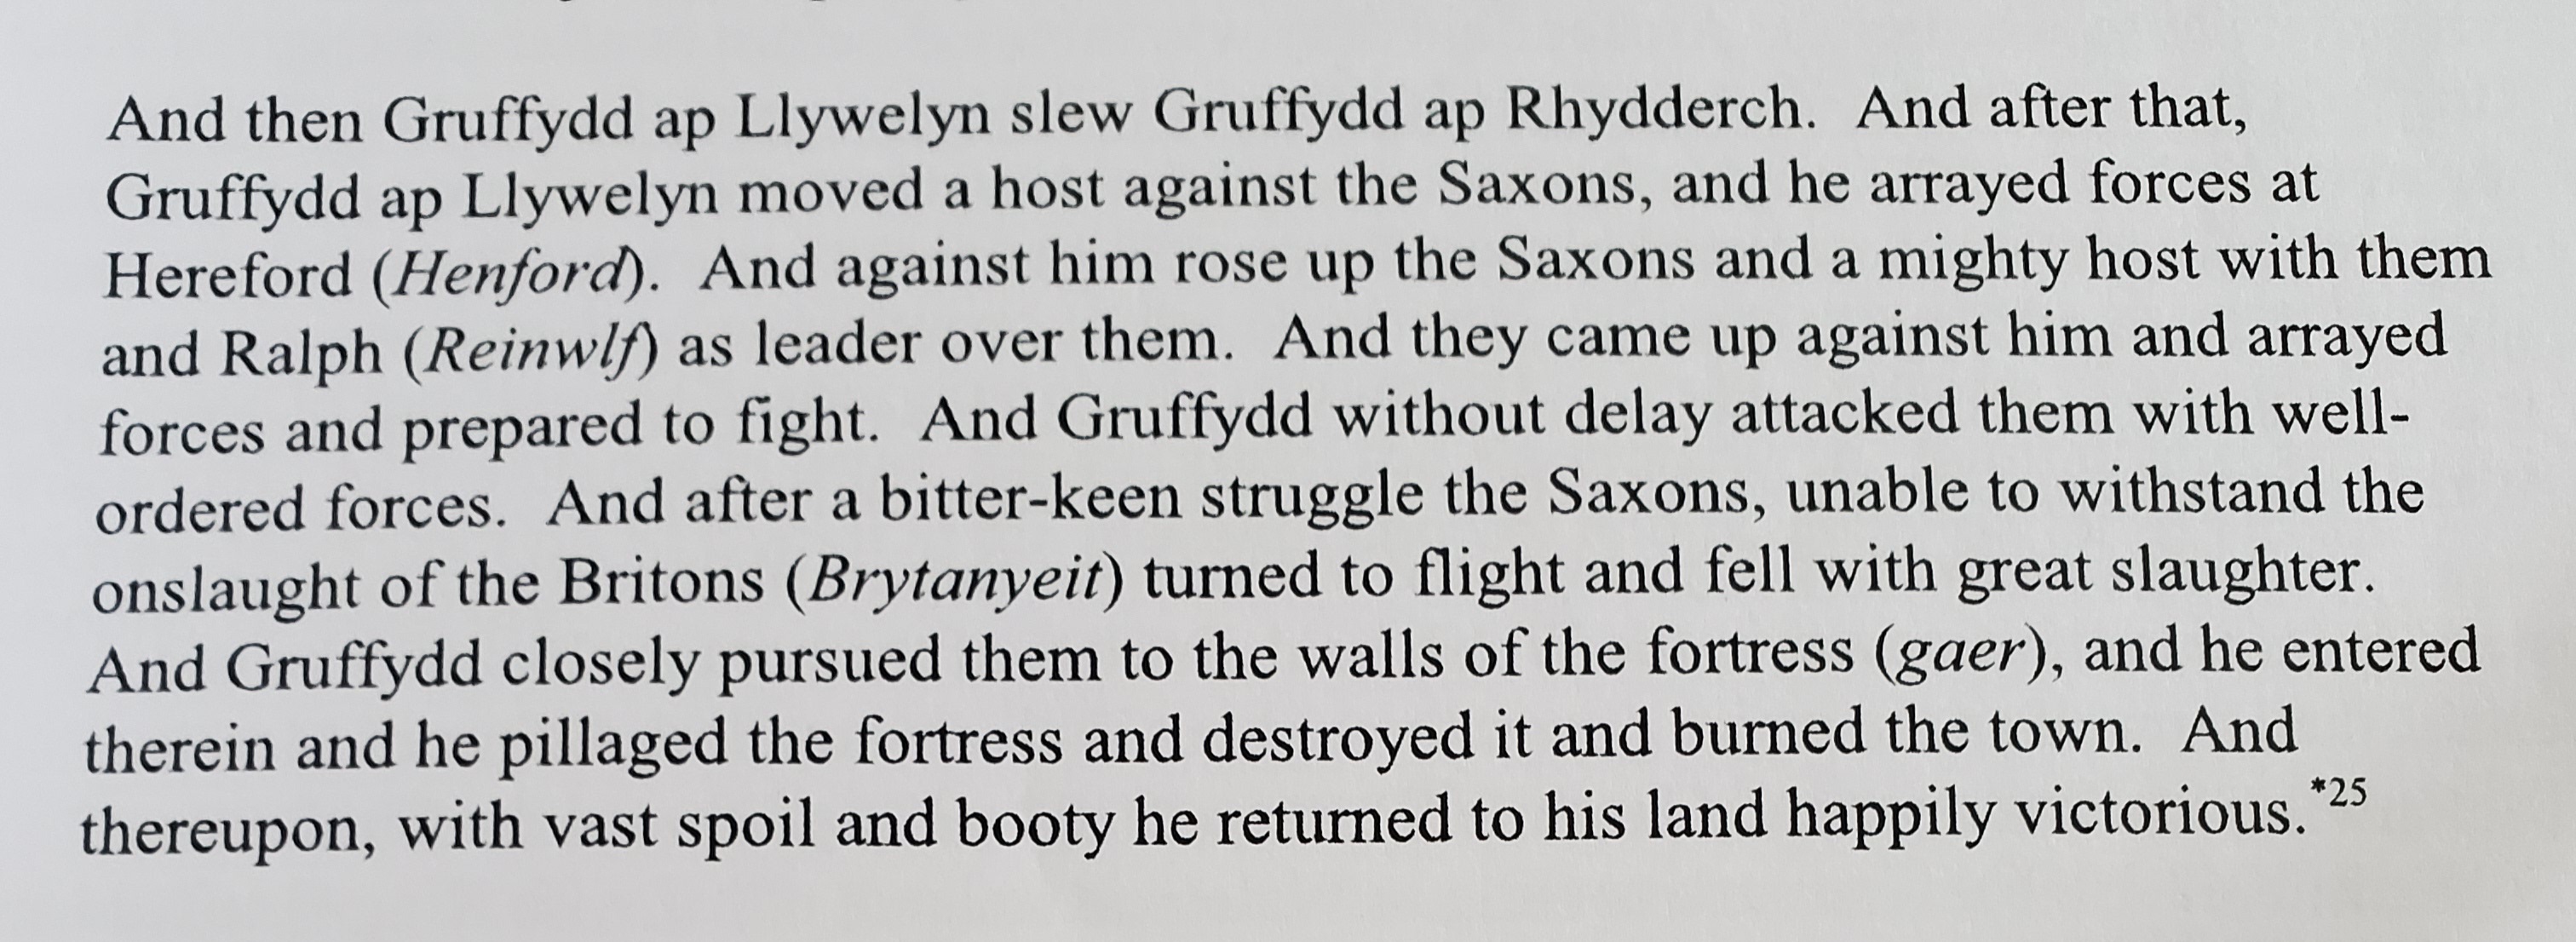
The battle in question is Hereford in Wales, October 24 1055. PR presents no less than nine [!] versions of this battle from various chronicles, some very brief, some much longer, grouping them by date and likelihood. He gives us a chance to consider which account seems most likely to be true but also analyzes them himself.  This is a good representation that I favored from p.13-14:

And this account presents a different view of the fighting, from p.15:

From these, I decided to work with the following "most likely" facts:
- Two leaders, Earl Aelfgar and King Gruffydd ap Llywelyn of Wales
- A largely Welsh force of the King, a "well equipped army of all his kingdom" with the possibility of 18 shiploads of Irish with Aelfgar.
- Opposed by one leader Early Ralph "The Timid", nephew of King Edward "The Confessor" and a 'mighty host' including Normans and French.
- The Saxons "arrayed forces and prepared to fight" 2 miles from Hereford
- The Welsh "without delay attacked them with well-ordered forces"
- Ralph and his Normans and French fled as battle was joined, and/or there was a bitter fight after which the Saxon force fled, losing 400-500 men.
- The Saxon "fleeing" may have been precipitated by their Leader [!]
- The Welsh followed so closely the two miles to the fortress of Hereford, that they were able to enter and destroy it.

Thoughts: 
- The Saxons arrayed their forces in open battle a few miles from their castle.
- - Ergo, they must have thought the Welsh force could be defeated in open battle.

- The Saxons fled, perhaps after a brief struggle, perhaps after a bitter one
- - The size of the Welsh force may have been much larger than they thought - after all, it was raised by the King of Wales from "all his kingdom".  

- This may have caused their flight to Hereford in an effort to save the castle as the field battle appeared unwinnable. 
- - This would explain why the leaders led the retreat - it is more important to save the strategic asset [the castle] than a tactical asset that can be replaced [a field force]. Let us not accuse them of cowardice when those who live on the borderlands are more likely to be veteran campaigners with "the long view"!

So the category of battle here is "a fighting retreat", requiring some forces to escape [to save the castle] while they delay an overwhelming force of Welshmen that has surprised them, original reports likely indicating a more modest raid.

Arriving at this decision joggled a memory in my "something wanted always buried" brain, and I turned to Neil Thomas' "One-Hour Wargames" for a scenario about a retreat that I couldn't quite remember. This book has not only been the most-used book I've owned, but it is also the best bargain at a measly $15 or so!

After a bit of page-turning, I found it: #9 "Double Delaying Action".  
While I do not usually print the entire pages, here this is VERY promotional of the OHW book, which I heartily recommend you hurry to buy!  
Red needs to exit three of six Units [50% of the force] off the table. Blue needs to exit two Units off the table.  ALL must exit by the road, which is an interesting condition that suits the history perfectly - the Welsh need to harry the Saxons closely so that they can gain entryinto the castle.

My logic for picking this scenario is that:
- it is an equal force per side
- Earl Ralph initially planned to fight a battle...when he saw the immense size of the Welsh force [imagine it is several times larger, and off the south end of the table], he decided that discretion was the better part of valor and began evacuating his force.  

So makes sense from the history, and will be an interesting challenge.  In this case, it may be said to be a clash between the entire Saxon force and the Welsh vanguard.

Translated onto my 3x4' table [1' wider than the book], it looks like the below:
The "town" from the original scenario is now a fortified camp, giving a defensive bonus to the defender as it is on a small hill improved with barriers of felled trees.

The River has a ford to left and the bridge to right, where the Roman Road is.  Those fellows, always on a building project.... The two armies are just laying on the table, NOT set up, waiting for their Kodak moment.

Now, with a scenario, and 5-6 Units in mind, which fits the One-Hour Wargames size limit, what do the forces look like?

Earl Ralph "The Timid", aka Saxon / Norman / French.  I imagine this as a levy force from the area and the castle itself.  Therefore some professionals with some levy to prevent what appears to be a raid from Wales:

The Army of Ralph "The Timid" in terms of "Chainmail" rules, by Gygax / Perren
"Knights" [in quotes as it seems Ralph was working on developing this force]
1 Leader, Ralph "The Timid" [I love writing that...!]
10 Heavy Cavalry, Impetuous, [on the hill]
2 x 16 Levy Heavy Infantry "Select Fyrd"
12 Dismounted Knights, Armored Foot
16 Garrison Mercenary Archers, Heavy Infantry, Bow
4 Hunters, Light Infantry, Bow
TOTAL 336 points 

The invading Welsh:
Two leaders, Earl Aelfgar and King Gruffydd ap Llywelyn of Wales
10 Teulu, personal bodyguard, Heavy Cavalry
6 Servants, Light Cavalry, Javelins

2 x 10 Archers, Light Infantry, Bow
1 x 24 Heavy Infantry
TOTAL 318 points, + a second Leader

The force selection is based upon a variety of sources, from Ian Heath's "Armies of Feudal Europe" to this article by the redoubtable Daniel Mersey [CLICK].

On the table, this will look like... 

Ralph "The Timid" and his "not so timid" dismounted knights, occupying camp.

Earl Aelfgar and a force of Welsh spearmen:
King Gruffydd ap Llywelyn of Wales and his mounted Teulu, bodyguard.
OK, so the coat of arms is really William Marshal...sue me.

Now, we are ready to fight! 

The question is, will the historical outcome be the "most likely" outcome?

Wednesday, August 17, 2022

Terrain List for One-Hour Wargames scenarios


Here's the list I have compiled.  If there's any corrections, please LMK!

From this post is the short summary: 

https://ecw40mmproject.blogspot.com/2019/12/one-hour-wargames-terrain-list.html  

And here's the list in full [color coded]

One-Hour Wargames: All Needed Terrain

1.       2-Level 6x12” Hill x 2

2.       2-Level 6x12” Hill, 6’ of road

3.       2-Level 6x12” Hill, 6x6” wood, 3’ of river2 bridges

4.       2-Level 6x12” Hill, 6x12” wood, 3’ of road

5.       2-Level 6x12” Hill, 6x6” wood, 3’ ea. of river and road, 1 bridge

6.       2-Level 6x12” Hill, 3’ of road

7.       2-Level 6x12” Hill, 2-Level 18x12” Hill, 6x6” wood

8.       2-Level 18x12” Hill, 6x6” wood, 3’ of road

9.       2-Level 6x12” Hill, 6x6” wood, 6x6” town, 3’ ea. of river and road, 1 bridge, 1 Ford

10.   2-Level 12x12” Hill [impassible”], 12x12” wood, 6x6” town, 3’ of road

11.   12x12” wood, 6x6” Swamp,6’ of road

12.   2-Level 6x12” Hill,  6x6” town, 3’ ea. of river and road, 1 bridge, 1 Ford

13.   2-Level 6x12” Hill, 12x12” wood, 3’ of road

14.   2-Level 6x12” Hill, 12x12” wood, 6x6” town, 3’ of road

15.   12x12” wood, 6x6” town [“fortification”] x2

16.   2-Level 6x12” Hill, 6x12” wood, 6x6” town, 3’ of road

17.   2-Level 6x12” Hill

18.   6x6” town, 3’ ea. of river and road, 1 bridge, 2 Fords

19.   6x12” wood, 3’ ea. of river and road, 1 bridge, 1 Ford

20.   2-Level 6x12” Hill, 6x6” wood x2, 3’ of river2 Fords

21.   2-Level 12x12” Hill, 1.5’ of road, 1.5’ of swamp [3” wide], 6x6” town

22.   2-Level 6x12” Hill, 36x12” wood, 6x6” town [“fortification”]

23.   2-Level 6x12” Hill, 6x6” wood x3, 8x8” town, 3’ ea. of river and road, 1 bridge, 2 Fords

24.   12x12” wood, 12x12” Swamp, 3’ of road

25.   2-Level 6x12” Hill, 12x12” wood, 3’ of road

26.   2-Level 6x12” Hill, 6x6” wood, 6x12” wood x2, 3’ ea. of river and road, 1 bridge

27.   6’ of road

28.   2-Level 18x12” Hill, 6x6” town, 3’ of road

29.   2-Level 18x12” Hill

30.   2-Level 18x12” Hill, 6x12” wood, 8x8” town, 3’ ea. of river and road, 1 bridge, 1 Ford


Roads & Rivers: 3” width – could model narrower with cleared berms and banks

·         4 HILLS: 2-Level 6x12” Hill x 2, 2-Level 18x12” Hill, 2-Level 12x12” Hill [“rough”],

·         6 WOODS: 6x6” wood x3, 6x12” woodx2, 12x12” wood,

·         2 x 6x6” towns, 8x8´town, 6’ of road, 2x Bridges, 2xFords

·         3’ of river6x6” Swamp, 6x12” Swamp, 12x12” Swamp

Obviously, some terrain pieces could be built up from two-three others, like making a 12x12” wood from 2 6x6” woods and one 12x6” wood, for example. There are a couple of scenarios with a 24”x 6” Hill but the 18” long one will do just as well, or you can put together the two 6x12” Hills, you’ll just have a saddle in the center. There’s also a giant woods in one scenario, 1’x3’, but probably best done by marking the line of the table with string/yarn, and distributing the 4 Woods into the space.

Friday, March 8, 2019

Battle of Badon: Neil Thomas AMW & OHW #4, p.2

Well, that was so much fun, I had to have another go, hoping to correct errors on both sides. This will have to be a briefer summary as the last one took three days to bang out! [I'm using the larger font to remind me of this...]

Turn 1-2. Saxons dash ahead, with the left weighted heavily, with two Units of peasant Warriors, going up the flank and the two Units of Nobles smashing directly into the hill. The last Warrior is on the road, and the Archers will harass from the Woods. The goal is to maximize the power against the hill while shortening the time to take it.

Nobles quickly smash Archers; 9 Hits and the Archers fail both morale checks so lose two more bases...gone. They did manage to inflict 6 hits between shooting and melee before evaporating like faerie in the morning mist.

To left, the Nobles don't do quite as well of course, but inflict two bases lost to their one.

Plan looks good for the Saxons - all is ready!


Ah, now we get into rules issues...How does this contact take place? Front arc barely makes it. Corner might touch, but turning sharply will cost movement. Unexplained!

In any event, I decide it can't be done, so they move up and turn preparing for a smashing attack next turn on the Militia.

Briton cavalry advancing to the rescue quickly - but not quickly enough. Left flank is open, but will the Saxons charge and risk a flank attack from the Roman Remnant shieldwall?

Again, can the cavalry make it? Rules are unclear. Guess I'll have to write them myself...Still, you can see the point, "You can't have tactics on the table if you don't have mechanics in the rules." It's a risky charge with the Saxon Nobles poised on the top of the hill, but, "CHAAAAARGE"! And it gets them away from the Saxon Warriors on their flank and somewhere that they'll do something useful for the cause...I hope.


Meanwhile, the Saxon Archers [lights] and Warriors are ready to take on the Roman Remnant infantry on the march - before they can get into shieldwall.
and the Nobles charge the rear of the cavalry, inflicting only two Hits. Still, the other Nobles and Warriors overwhelm the Welsh Militia who flee to the right, having done well for militia.

Up close look at the swirling melee of two Cavalry trying to overwhelm a Warrior Unit, while the Nobles try to rescue them or at least trash one Cavalry Unit. Unfortunately, the Cavalry are looking good at a couple Hits each while the Warriors have lost much of their fighting power.
In the melee phase, both cavalry and the Saxons take enough Hits for morale checks! Anything can happen... 
[and this is a good point to mention that this simple mechanic adds a lot of fun tension to the game].
The left Cavalry roll '6' - a pass for anyone. The Warriors roll '5' and easily pass [need a '4+] while the right Cavalry just pass with a '3' thanks to being Elite - the slaughter continues!

Meanwhile, the Saxon nobles push right to gain more control of the Hill - the ultimate victory objective.
And the Warriors slam into the open flank of the Cavalry, who REALLY need the melee to end soon!

Meanwhile, back at the road, the Romans take a severe beating from the attack of lights and Warriors.

Turn 6. Cavalry destroy the Warrior Unit they were both fighting, so the left takes on the flanking Warrior Unit fighting the right Cavalry. A Militia unit finally arrives to assist, inflicting three Hits against the top Nobles on the hill but they pass morale and just lose the one additional base.

Turn 7 - things start popping! Romans rout off the field, along with the top Saxon Noble Unit. However one Cavalry is almost wiped out and the other Saxon Nobles are entering the fray, while the Warriors hang in there to the left.

Bottom of Turn 7. Right Cavalry extricate themselves - no rally rules, unfortunately! Left Cavalry grind down the Warriors. Militia take on the Nobles but inflict no Hits while losing a Base themselves - it helps that the Nobles are up hill of the Militia. Still, Victory is up for grabs...
Unfortunately, militia fail morale on a '2' and lose another Base. Cavalry rout the warriors, and are now prepared to charge the flank of the Saxon Nobles on the hill!

Bottom of Turn 8. Militia hang in there while Cavalry inflict severe punishment against the Nobles - they knock off a Base and the Nobles fail morale! They lose another Base. Saxon reinforcements are on the way, and the Militia have an open flank, while the other Cavalry is barely functional with one melee dice of fighting power left!

Saxon Turn 9, their reinforcements crash in, routing the Militia from the field but too late for the Nobles who also flee. The suspense is unbearable! Two Cavalry, one weak, against the Lights and one Warrior Unit - who will master the hill and take home the glory??

Britons Turn 9 - they make their last desperate preparations. One cavalry positions to charge the Archers, the other holds the high ground and awaits the onslaught.

Turn 10. Very disappointing for the Celtic fans. The Archers way beat the odds and the top Cavalry is one Hit away from routing off the field, while the other has fared very poorly against the warriors, losing a base and failing morale while inflicting nearly no Hits of their own!

Turns 11 & Saxon 12. The Saxons hang in their and rout both Cavalry Units. The Warriors did lose a base but passed morale with a '5' and the Archers managed to beat the other Cavalry despite the dice bonus Cavalry get against Lights.
The Warriors beat the Celtics and move on to the finals!!

Whew! This was a great game, and lots of tension. The morale mechanic definitely adds some fun along with the Warband rules. While being a bit clunky at times, and of course suffering from incomplete mechanics, the game was a lot of fun.

I will definitely have to finish off the mechanics, stealing them mostly from my 6D6 medievals, while retaining the feeling that this is a larger scale game. My OHW inspired "Spear to the Strife" is really aimed at the smaller fights that make up 90% of the "battles", while this has a nice feel for the remaining 10% of big battles. I think it'll be worth it. 

As I have a group game coming up, it may be worth it to put this forward for the group - I'll have to playtest it as well as finish more Welsh and Saxons, all by March 30th!

Thursday, January 31, 2019

Battle of Badon: Neil Thomas AMW & OHW #4, p.1

4-bases or 1-base, the tactics are the same - CHAAAARGE!!!

http://d.lib.rochester.edu/camelot/image/rhead-arthur-leading-the-charge-at-mount-badon

Having enjoyed playing some "Wargaming: An Introduction" WWII, I thought it'd be fun to play the 4-base ancient system in that book, which is presented in more detail in "Ancient and Medieval Warfare". One of my main interests was to see how the "feel" was with the Dark Ages period, which is covered in the AMW rules and indeed this battle is the battle report. Therefore we have the Britons, or Sub-Roman Britons, or perhaps "Post-Roman Britons" fighting the variant early Saxon list in the Anglo-Saxon list of the AMW book.


As NT's Badon battle report was similar to OHW #4 "Take the High Ground", I decided to play it straight up, but with fewer units. AMW uses eight Units with four bases, and OHW uses 6 Units of one base. As I have large 1-base Units, I spin the 4-base system and mark a base loss with a red dice, 1-3, and Hits with a Green dice, also 1-3 [at 4 Hits a base is lost so the red dice goes up one]. This works well but does put "dice clutter" on the table. Still, can't be helped.


The Savage Saxon Slaughterers - here compiled from various Units and periods, but "all you barbarians look alike to me" will have to do. All figs Old Glory from the "Somerled Saxon, Viking, Norman" line [HERE]: left are Goths, center are Welsh spearmen with Gothic archers in front, right are Anglo Saxons - all from OG's Dark Ages line, I believe. The Goths to left are elite Nobles, the rest are average "Peasant" warriors, the archers Light Infantry. All have a light armor save of 6+ except the Nobles are a 5+ save. Personally, I think the Archers should have nothing, but perhaps dodging counts as a save?


Arthur's Bold Bashers of Badon. Rear Unit is Gripping Beast Dark Age Late Romans, representing the Roman Remnant Infantry - they can form a shieldwall [gives 3+ save but they move very slow]. 
The rest of the figures are Old Glory 25s: three cavalry are Irish, Welsh Archers and Spearmen [from the medieval "Revenge" line] acting as Militia. 


The monastic is an old Grenadier fantasy figure, a cleric I believe, wielding a mace and a cross - he stands next to his sacred tree and spring, ready to heal the wounded and defend them from outrages if necessary!

Turn 1-2. Saxons advance [duh!]. Both Nobles to left, Warriors center, bowmen to the woods - the safest place for them to be in a cavalry-rich environment! Romans hold the hill with a Militia spearmen and a light infantry Archer Unit. Marching to the sound of the savage cries are the cavalry, followed by the Roman infantry. There's no road bonus for movement, which is unfortunate as these guys are a bit slow. Archers on hill inflict no less than 7 Hits on the Saxon Warriors, rolling like gang-busters as pictured below with a 100% hit rate on Turn 2! You need a 4+ to hit in these rules. Saxons pass morale with a 4+ [red dice] but turns out you only check for a stand loss during melee, not from shooting.


Turn 3. The Saxons charge home, Nobles against the Militia, Warriors against Light Infantry Bowmen.  oddly, only javelins can shoot at an enemy charging them - easy to change, but...why? Don't bows shoot faster and have more missiles on hand??


Left melee is pretty even. Welsh get 1 dice per base and a bonus dice per base first turn for being up hill. Warband start the same and get a bonus dice per base first turn for being Warband. Militia get three with one saved while the Saxons get two with one saved.


Right Melee: Welsh start with 4 dice, one per "base", and get a bonus dice per base first turn of melee due to being uphill. They get 4 Hits, Saxons roll save and miss all [needing a 6] so take 4 Hits and roll a 3 morale so lose another base, total two bases lost [and only one Hit left!]. The Saxons have 3 bases so start with 9 dice [3 per stand v. Light Infantry] and get 3 more for charging warband, total 12 attack dice. They get 7 Hits and the Archers save one for 6 Hits but roll a '1' morale for losing the base and lose another base.

Whew! Lots of dice!

Total damage Saxon Turn 3. Looks like there's about to be a hole in the center of the Saxon attack...didn't think the archers would do so well! Makes the cavalry seem even more menacing.


Welsh Turn 3, the big picture. Cavalry are coming along quickly, while the Roman Remnants plod down the road at 4" a turn. Saxons are pushing well on the hill and have a solid line across the board, even holding the woods. However, there's no reserve. 


Saxon Turn 4, the Nobles crash in on the flank of the Militia holding the hill.  With the original melee opponents, the Welsh inflict one Hit, the Saxons 4! But one is saved.

The flanking Nobles inflict another 6 Hits!

Militia fail morale and lose another base - they needed a 5+ and got a '4'.


Briton Turn 5. Cavalry advance down road, followed by Roman foot - their slow pace makes them unable to support the Cavalry who are in danger of being flanked if they charge too early. In the melee phase, the Nobles at the Militia front take 2 and lose a base but pass morale, needing a 3+, while flanking Nobles wipe out the Militia. Archers lose another base but pass morale with a '6'! Cavalry flank Nobles but only inflict 2 Hits.


Saxon Turn 5. Had to decide if a Unit could enter a gap over one base wide [the Unit is two bases wide by two deep] and it seemed odd not to let them thru a gap that size - it looks quite big! This is a good example of a mechanic absent from all NT rules - passing a gap. Anyway, I decide to let it happen and the Nobles charge through and get 5 Hits - very good rolling - but the Cavalry inflict back three Hits and pass morale. Saxons charge a Warrior at the Cavalry before them, knocking off a base. Coming back they only inflict one Hit, but they pass morale easily with a '6'.


Briton Turn 5. They retreat the Cavalry from Melee and form shieldwall with their Roman foot intending to advance them and grind down the Warriors with their superior 3+ Save v. 6+ Save. Archers finally kill the Warriors in front of them - beginning a heritage of elite light infantry? Pic also shows that during the Saxon Turn 5, the other Saxon Warrior headed to the hill to make an attack, while the Saxon Archers in the woods shot to no effect.

The two melees on the left grind on slowly.

Saxon Turn 6. Archers get a hit on the Roman shieldwall. Warriors continue to move against the Archers whose cheers of victory have dwindled to a low murmur as they see the fate in store for them, nearly surrounded by savage Saxons! Might be a move in this...Two left melees grind along. To far left, both the Cavalry and Nobles lose a Base...

...and must check morale. cavalry pass, Nobles don't! They lose another base. This was critical - if it had been the other way, the Nobles would have gained ground and tied up at 2-2 bases lost. As it is, with one dice per melee phase, their max is to inflict one Hit!


Briton Turn 6. Cavalry on hill fail morale and lose a base - but the Saxons do too.


Saxon Turn 7. The savage Saxon charge crushes the Archers. Bit disappointing b/c they inflicted 5 Hits and the Archers saved 2! Unfortunately, 3 Hits was all they had left.

In the center, the Warriors gamely charge the Roman shieldwall. Results are 2 Hits each.

Briton Turn 7. Saxons are struggling to gain the hill - they have a fresh unit on hand, however. This scenario  has always been a tough proposition for a melee period, shooting eras tend to favor the attacker as a lot of firepower can be brought to bear quickly. I flattened out the Saxon Warrior on the hill fighting the Cavalry - again no rule for it - but it looked better and I was definitely not allowing two Saxon Infantry to gang up sideways on the front of the Briton Cavalry!


Saxon Turn 8 [red dice]. The Archers emerge from the woods, leery of the Briton cavalry beyond the Roman shieldwall. Both Units roll poorly and inflict only one Hit, and both save - even the Saxons who needed a '6'! Another critical roll - had they failed, they'd have lost a base, and if they failed morale would have lost another, resulting in them only having 2 melee dice to 4 next turn, and with their Roman opponent having a much superior save!


Working left, the Warriors continue to move left, which is a good choice as the Nobles take their last Hit and flee the battle!

Briton Turn 8 [blue dice]. Left Cavalry swing into the Saxon Nobles on the hill - fight the objective! Another rule mechanic problem - can the Cavalry charge into the Gap? It is over a base wide. They should be able to since I let the Saxons do it.

In the event, I choose not to as the Nobles on the hill only have one Hit left and are flanked. 
Nobles take two Hits and are destroyed.

Saxon Turn 9. The Warriors shifting left have a rule mechanic dilemma. They can certainly reach either Unit, but that to left seems more "forward", so seems right choice.
They slam in and get a great roll - 6/8 Hits, and if the Britons hadn't passed morale the Unit would've been finished, pretty much. In reply the Cavalry inflict...1 Hit.


On the right flank, the Saxon light infantry Archers charge. They start with one dice per base like most, but are doubled for a flank attack and roll 5/8 Hits! Fortunately for the Roman infantry, they make 4/5 of the saves, and pass morale on a 3+


Briton Turn 9. The Cavalry again need mechanical guidance, and one wonders if they should hit the front or flank of the Archers. 
As they start in the front 45 degree arc of the Target, I call it as "Front" and they get 3 dice per base against Light Infantry, anyway. Still, it is a constant reminder that "rule mechanics shape tactics", or if not present, they "don't shape anything".

On the left, Briton cavalry charge the Saxon Warrior flank, of course. However, they have only one base left, so are maxed out at 2 dice attacking, or 2 Hits a turn at the most. But, I must've been distracted, and I let them roll 4 dice, plus a bonus 4 dice, missing entirely the fact that they were mostly trashed. This is one problem with this type of game...lots of little things to remember.

End result, this Saxon warband is beat up, but shouldn't be.
Meanwhile, on the right, the Cavalry inflict 6 Hits on the Archers, who also fail morale and lose another base. At least I got the calculations correct!

Saxon Turn 10. In the melee phase, the Saxon Warriors are wiped out. Again, the calculation is wrong - there should be four dice, 2 from the cavalry in front, and 1, doubled, for the one on the flank. Meanwhile, the Cavalry take out the Archers and I concede for the Saxons, for whom victory seemed in doubt, anyway.

This was a fun game, and the taking of pics and notes probably doubled the time and reduced the focus of just playing it out. In other words, I think I'd have been fine if I wasn't trying to document this for posterity!

I think the drama of rolling morale is fun, as well as the various stages of combat. While GW uses these aged mechanics in their rules, also, it is simpler here and gives a good balance of "feel" with acceptable speed [altho not the fastest mechanics - OHW is much faster]. So it depends on what you want.

The movement rules make the Units more sluggish so it feels like a bigger scale game. More like 1000 foot or 500 Cavalry and Lights per base, instead of the hundreds of my take on OHW.

Overall, I think these rules have a place in the pantheon, but will demand a re-write with a bunch of mechanics worked out in some detail as circumstances warrant. 

Given that you will have to finish writing the rules, I think these are a good but not great set. They are pretty quick to play and have some fun special rules without being overwhelmed by special rules. NT found that balance, anyway. So "it all depends", but I recommend picking up this book and tinkering away with the rules to have some fun game nights, and they are good for solo play also.

This AAR was a lot of work, so altho I did a replay of this, it will have to be a bit more streamlined. I hope that some of the explanation of mechanics is useful for people who want to play these rules, especially newer wargamers. Stay tuned for "Badon II"!