Friday, June 7, 2019

Grid Game AAR: OHW scenarios #23 & 30

Coedysbys 1094.  A battle of the Welsh uprising against the Normans. 

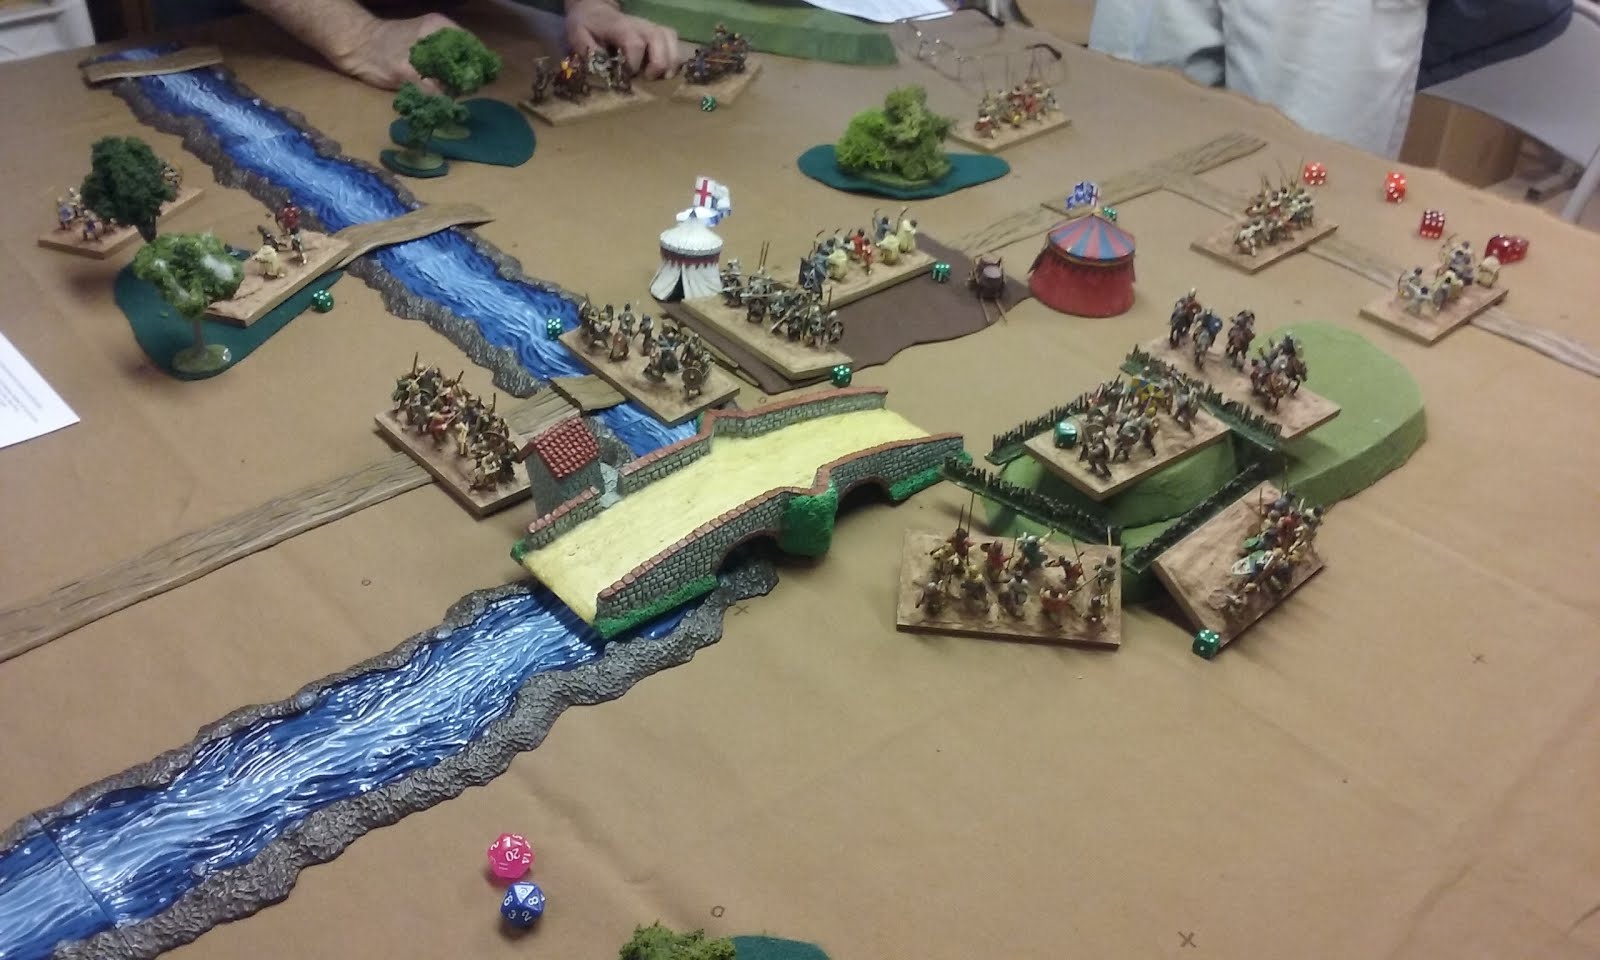
great looking table, nice figs, nice guys - what it's all about!

The concept of the scenario is that an overwhelming Welsh attack has fallen upon and surrounded a small Norman force which has built an improvised hilltop redoubt and sent for help. The message does get thru and a strong Norman force is on its way. Unfortunately, the Welsh have surrounded them and are occupying all the fords between the Norman relief force and the encircled Normans. The Norman relief force must break thru the Welsh "Defense in Depth" before their comrades are wiped out in a "Last Stand".

This is another combination game of two "One-Hour Wargames" scenarios, #23 "Defense in Depth" and #30 "Last Stand". The scenarios work very well in pairs or more, and I've used as many as 3 together previously. 

Scenario #23 Defense in Depth [the right card]
The attacking Normans arrive from "card North" and have a bridge and two fords to cross over. The Welsh occupy the "town" which is acting as a fortified camp in this instance. The distant ford to right is clear but the center one is obstructed on one side by woods, and therefore only usable by skirmishers [Brigans, as called in this game]. 

The Normans have a strong force of three Knights [one may dismount as Serjeants] two Bowmen [one may be switched for Brigans] and a Serjeant [heavy infantry, basically]. These enter anywhere on the North table edge turn 1.

Facing them, the Welsh have only a portion of their total force, 4 Units: a Serjeant [representing dismounted Welsh Cavalry, or Teulu], a Bowmen, a Brigans, and a Freemen Unit. They may set up anywhere South of the river, with one Unit North of the river.


Scenario #30 Last Stand [the left card, turned 90 clockwise].
Here, the Normans are hard-pressed with only 3 Units, but have a redoubt on a hill which provides protection from Shooting and an advantage in Melee and slows Melee attackers. Their Units are a Serjeant, a Bowmen [mercenary crossbows], and a Freemen.

The Welsh are making their main effort here to wipe out the hated Norman invaders and erstwhile overlords. They have a full 6 Unit force, and each Unit is replaced if destroyed - it reappears next turn at the left or "table West" edge from where the Welsh are deploying. The friction point is a 15-turn time limit, the success or failure of the Norman relief force, and the time delay for the "infinite" Welsh hordes as they re-enter the game. This would also make a great Gondor v. the Orcs scenario, wouldn't it? 

The players were a very experienced game designer, publisher and retired infantry LTC as the Norman [with a Welsh wife...we probably shouldn't state his choice] opposed by a retired USAF pilot who was very comfortable with the gridded aspects of the game since he had just played some "To the Strongest" at a convention. Both are experienced wargamers, so things moved along quickly with only the occasional question / clarification.

Below, a couple turns into the game.
Table East, the Freedom-Fighting Welsh deployed with Serjeants in the camp with the Bowmen, the Brigans in the woods by the center ford, and the Freemen holding the distant Right ford. In the face of the superior Bowmen shooting, the Brigans begin to retreat across the ford next to their woods. All other Units are braced for impact!

The Norman Oppressor chose to dismount one Knight and with the Serjeants attack across the bridge against the camp, which is a tough mission. Far ford has two units of knights poised to crash across it into the unfortunate Freeman Unit. In the Center two Bowmen are poised to oppose the Brigans and offer support to the attacks on the left or right ford as necessary.

On Table West, the Norman Serjeants hold the redoubt while their archers engage in a duel with the Welsh Bowmen in the camp. A Freeman Unit holds the bridge at the town, which seems quite solid until the Welsh use support Shooting from their Bowmen. The other ford is unopposed and Welsh Cavalry and Freeman swiftly move across it.

Different angle, same turn...One Welsh freeman is attacking across the river, which is strongly held by a Norman Freeman Unit. However, they do have their archers helping out.


Several turn farther along the game. 
The Welsh made quick work of the Normans holding the town at the bridge, and then move along the road as fast as they can to help their force hold off the Norman relief force. Two Freemen and a Bowmen are at top right moving to oppose the Norman Knights that forced the far ford against the Welsh Freemen. The Welsh are holding onto their camp and inflicting as good as they are getting there. 

The Normans are also holding onto their redoubt, but are outnumbered 3-1. The Norman Bowmen on the hill were destroyed pretty quickly by a combination of Welsh shooting and a charge from the Cavalry. The last Unit surviving is the Serjeants in the redoubt - but will the relief force make it in time??

Below, same turn, different angle.  At center top, one can see that the Brigans managed to destroy one Norman Bowmen Unit, but are having a tough time with the second. The Norman knights that crossed the river have tough choices to make between spending time to rally off Hits and get stuck in to help their friends.


Conclusion. In the end, some poor dice resulted in the Norman relief force being beaten off altho they broke into and contested the camp. The Welsh only used their "horde" rule for a couple of Units that were destroyed attacking the redoubt. This fell at the end of the game, the Welsh force being strong enough to inflict damage every turn.

As both commanders were experienced, the result rested mostly on dice and a couple of tactical choices. The Normans chose to fight the Brigans in the center, who then retreated from the woods onto the ford. When the Bowmen then switch to supporting the attacks on the left and right fords, the Brigans returned and managed to destroy a Bowmen before being destroyed themselves. 

It probably would have been faster for the Normans to pick one Unit of Brigans to attack the opposing Brigans, while using one bowmen to help with the attack on the far ford, the easiest place to break thru. This would have gotten the Knights across the river faster and in better shape, which would have positioned them better to attack the camp from the flank / rear. Instead, the Welsh relieved their camp first.

There is always a tricky proposition in allowing the two scenarios to interact, or not. Generally, gamers have a larger view and more aggression than real life soldiers, so it is probably a better choice to only allow units to stay in their own game - just a little advice for those wishing to do double or treble scenario big games on their own.

An interesting alternative choice with the Norman mercenary Bowmen would be to put them in a supporting and distracting position behind the woods instead of on the hill. This would have held off at least one Unit from the attack on the redoubt as their shooting into the rear would be doubled, so they couldn't be ignored. With a little luck, they might take out a Unit and survive to keep shooting.  As it was, they were quickly destroyed by the Welsh Bowmen in the camp and were unable to keep the redoubt from being overwhelmed at 3-1 odds. Granted, it still held out a long time, but that had more to do with poor dice on the part of the Welsh!

Overall, the gridded rules worked very well. Players were confined to clear and obvious maneuvering, which speeded the game along. The tactical choices were clear and in a re-play of the scenario, I think the Normans would have won.

An interesting by-product of the gridded game is that the mechanical choices are streamlined and sublimated to the larger tactical decisions. I think this allows players to concentrate on command decisions more, learn tactics faster and understand the military side of things instead of being distracted trying to figure out how the mechanics work.

So overall, a great playtest showing many positive aspects of playing "on the Grid"!

Tuesday, May 28, 2019

Grid Game AAR, One-Hour Wargames #4

A Nail-biting finish! But did we enjoy getting there?

One of the most important things about today's game? My Commission Figurines UK, casualty markers [LINK], a Christmas gift from "Sound Officer's Call" Steve.


Below, is the grid I set up below - the larger shiny white bead at the corner marks the 12" squares, and smaller one in the center marks the 6x6" square. My Units are 2.5" x 5" which fit just right [not coincidentally - I chose a base size that was smaller than 6" so that there would be wiggle room on the 3'x3' grid]. The red dice show the squares for game play.


Below, getting set up. The two Units in the road start where the example grid is. The defense reinforcements are arriving at or right of the road, attackers from the bottom.

Hopefully, the grid is pretty clear but not obtrusive. Marking corners seems to be enough most of the time. Of course, I'm also VERY familiar with this 3'x3' layout! 


Turn 1 below. Saxons enter the table to seize hill from Arthur's militia - a Freemen and a Bowmen Unit. Their plan of attack is obvious - Nobles will hit the open left flank hard and fast, and slam into the Bowmen; meanwhile the Warriors pin the Militia on the hill and hold the road valley, with their Brigans using the woods as a bastion of support since no Breton Unit can enter it. The Saxon plan is to hit all the weakest spots with the best troops, and pin everywhere else, hoping for a quick breakthrough.


Turn 2. Arthur's cavalry enter, leading the way, followed by a Unit of Roman Remnant foot and a Militia to the right. The cavalry doesn't pass their bonus move opportunity for the road. The opposing Saxons on the road and in the woods do, however. Bowmen did not achieve anything with shooting. The cavalry are going to just make it to the hill.


Turn 3. Bretons advance, one Cavalry charging the Warriors on the road, the Militia heading into the valley and the Romans heading for the hill. Saxons push forward and have a solid line, albeit with no reserves. Brigans begin sniping at reinforcing Militia from the woods - the Militia can not enter [having clear cut rules about things like this makes life so much easier...]. While the left most Nobles have an open flank, the Militia dare not leave the hill to take advantage of it with a Unit of Warriors lurking close below! A good example of achieving a military goal by standing off - most gamers are poor at this!


Turn 4. Breton cavalry pull back to the hill - which is the objective, anyway. Romans head for the hill, also, while the battle line in the valley is set. Saxon Brigans leave the woods and snipe at rear of Breton battle line. They don't do much damage, but it is doubled. The Cavalry are almost dead and the Warriors they face are close - 5 Hits. Melee on hill is going slow due to the defensive terrain and bad dice rolling. The valley will end quicker...

Breton Turn 5. The cavalry show their noble prowess and roll perfect, destroying the opposing Warrior Unit.
But on Saxon Turn 5, the Brigans - who aren't allowed to charge frontally at all - charge the rear of the Breton Cavalry and destroy them in return!

Turn 5. The road is clear, and the Romans are new neighbors to the Brigans who would certainly find that a bit uncomfortable. However, they are focused on their own Bowmen who will probably not last much longer. Overall, the hill fighting is going against the Bretons, interestingly.

Turn 6. Romans and Brigans engage in melee. The Brigans will surely lose, but they are keeping the Romans occupied and out of the hill battle. The valley fight is about to end...

Turn 7. Breton militia are destroyed. Hill fight continues to go against the defense.
Have to say that the grid movement simplifies and clarifies maneuver decisions.

Turn 8. Bretons on hill are on their last legs, while the Saxons fail to rally in the valley.


Turn 9. Breton Bowmen break - their Saxon Noble opponents are at 6 Hits, however, which is really a good job by the Bowmen. Shame there's no one free to take advantage of the situation. Saxon Warriors in valley rally a Hit off.

Turn 10. The Militia are destroyed by the Warriors. The Nobles are tied with the Cavalry, both teetering on the edge of destruction at 6 Hits. Warriors rally off a Hit again, and are doing pretty well with only 3 Hits left. Great example of thoughtful use of troops.

Turn 11. Things bust apart on the hill. The Cavalry destroy the Saxon Nobles [who rolled abysmally] but are then destroyed by the other Saxon Nobles. Romans finally start bringing the pain to the Brigans. Saxon Warriors rally off another Hit!

Turn 12. Romans finish off the Brigans, but they are nearly surrounded by angry Saxons and are clear candidates for a mugging...
...which happens in the Saxon player turn; and the Saxons roll well, also. Ugh!

So this went very well. I really do like how the grids work. The big advantages I can see with them at this point are:


  1. reduce movement decisions,
  2. simplify mechanics of movement greatly,
  3. reduce opportunities for gamey behavior, playing the rules to advantage, etc,
  4. make game more accessible for newbies,
Can't see any disadvantages except that some gamers like free movement on the table, feeling it is more "realistic". It probably is in execution, but it is probably not as realistic from a leadership perspective; actual leaders work on much more general terms than the minutia of movement mechanics that most games require players to go thru. So overall I feel like I had fun getting here and was able to concentrate on battle decisions and stay "above" the micro-movement mechanics that I would delegate to some sergeant or equivalent. 

Next post - playtest with real gamers!

Tuesday, March 19, 2019

SttS: Getting on the Grid

This Gamer is WAAAAAAY off the Grid - hopefully the commune has a shower...
Image result for getting off the grid
https://theoffgridcabin.com/start-here/

After lots of thinking, visits to various blogs [click], time with Bob Cordery's Portable Wargame [click], and re-visiting board games [click, click], I've decided it's time to take a set of my "6D6" rules and put it "ON the grid" - shave and a haircut required despite it being a Dark Ages game with "Spear to the Strife".


As we've been working on "higher level command" wargames [gamer is division or corps commander], it is more apparent that the limitations inherent in the hobby - terrain miniature, time, space, budget - make it easier to put some games on a grid rather than move freely on a table. I'd say if a Unit in a game is a brigade or higher, then it should be on a grid. This prevents the players from micromanaging their sub-units and getting bogged down with the oft-times complicated mechanics of table-top miniatures, bases, and terrain, and their interactions.

I think the freedom of movement with miniatures is more suited to skirmish, small unit, and battalion / regiment level gaming where it "feels" more realistic. Of course, in real life, your division, corps or army level staff don't get into the nitty-gritty of maneuvering Soldiers - that's the job of someone else.

To summarize, here's where my head is with grids:
More [yes, MORE] realistic!

- conceptually, the way real military leaders think
EASIER: eliminates fiddling with 1/16" and mm in/out
- slims and simplifies rules by eliminating lengthy explanations about mechanics
- eliminates pre-measuring question
- eliminates measurement arguments
More fun!
- total reciprocity of distances eliminates many "gotcha gaming" techniques
- encourages players to play their role and period, not the rules

Downsides
- tabletop gamer prejudice [STRONG prejudice]
- "feels" less real to certain mindsets [see above]
- eliminates friction elements of Unit / terrain / miniatures interaction that is sorta realistic [as long as you can't pre-measure] even if it is cluttered.
- do lose some small tactical possibilities with wiggling Units around, depending on if the mechanics of your ruleset take advantage of such things

With the above in mind, here's how I am adapting my "Spear to the Strife" Medieval Miniatures Mayhem game of low-level combat [about 500-1000 a side].

GRIDS=SUPER EASY! The 12" squares that make up most game tables are divided by markers [beads below] with the 12" intersections being larger than the 6" intersection. below, the red dice mark the four 6" squares that make up the subdivision of the 12" grid. I could use 5 small beads, but it's not really necessary. Some people use a soft surface for terrain, like interlocking foam mats from the gym or childcare play areas [CLICK]; in that case you can use small push pins to easily demarcate large and small grids.


And this is how it looks on my table. A couple times I lost track of the spaces, but standing up and getting the overall picture cleared it right up thanks to the OHW terrain already being in 12" grids, anyway, and most terrain pieces are in 6" increments.

Mods for 6" grids

- 6" Move = 1 Grid,  
- 9" Move = 1 Grid, plus 50% chance at a bonus Grid per move
- 12" Move = 2 Grids
All get one free 90 turn per move point, and one diagonal a turn.
- 3" road bonus, 50% chance at a bonus Grid per move [doesn't stack with 9" move]
- Range Brigans = 1, Archers = 2, one diagonal for Range.
- can't pass grid side or diagonal point with impassible / blocks LoS terrain on both sides.
- LoS center to center [over half to over half].

Questions
- Must use Move to melee contact? 
Grids are pretty large, so table can get confined if a space adjacent to enemy Unit is automatically in melee. For now, I said "yes" you have to spend a Grid move to end in Melee contact, even when you start in adjacent Grids. I lined the Units up at the Grid edges.
- Zones of Control into adjacent Grids? Not interested in ZoC rules at the moment. I don't see all Units as moving in the order moved, or simultaneously, and centering the Units on their grid square has them apart enough that it looks OK to move around each other. Also, I don't like it when Units are in melee and not touching - looks weird to me.
- Diagonals. I like having 8 directions not just 4. It doesn't add much complexity to allow diagonal movement / shooting measurements, so I'm using them. Basic rule is you get to use one diagonal  per move / shoot measurement.

That was all I felt I needed to get started.  Let's see how it goes!

Friday, March 8, 2019

Battle of Badon: Neil Thomas AMW & OHW #4, p.2

Well, that was so much fun, I had to have another go, hoping to correct errors on both sides. This will have to be a briefer summary as the last one took three days to bang out! [I'm using the larger font to remind me of this...]

Turn 1-2. Saxons dash ahead, with the left weighted heavily, with two Units of peasant Warriors, going up the flank and the two Units of Nobles smashing directly into the hill. The last Warrior is on the road, and the Archers will harass from the Woods. The goal is to maximize the power against the hill while shortening the time to take it.

Nobles quickly smash Archers; 9 Hits and the Archers fail both morale checks so lose two more bases...gone. They did manage to inflict 6 hits between shooting and melee before evaporating like faerie in the morning mist.

To left, the Nobles don't do quite as well of course, but inflict two bases lost to their one.

Plan looks good for the Saxons - all is ready!


Ah, now we get into rules issues...How does this contact take place? Front arc barely makes it. Corner might touch, but turning sharply will cost movement. Unexplained!

In any event, I decide it can't be done, so they move up and turn preparing for a smashing attack next turn on the Militia.

Briton cavalry advancing to the rescue quickly - but not quickly enough. Left flank is open, but will the Saxons charge and risk a flank attack from the Roman Remnant shieldwall?

Again, can the cavalry make it? Rules are unclear. Guess I'll have to write them myself...Still, you can see the point, "You can't have tactics on the table if you don't have mechanics in the rules." It's a risky charge with the Saxon Nobles poised on the top of the hill, but, "CHAAAAARGE"! And it gets them away from the Saxon Warriors on their flank and somewhere that they'll do something useful for the cause...I hope.


Meanwhile, the Saxon Archers [lights] and Warriors are ready to take on the Roman Remnant infantry on the march - before they can get into shieldwall.
and the Nobles charge the rear of the cavalry, inflicting only two Hits. Still, the other Nobles and Warriors overwhelm the Welsh Militia who flee to the right, having done well for militia.

Up close look at the swirling melee of two Cavalry trying to overwhelm a Warrior Unit, while the Nobles try to rescue them or at least trash one Cavalry Unit. Unfortunately, the Cavalry are looking good at a couple Hits each while the Warriors have lost much of their fighting power.
In the melee phase, both cavalry and the Saxons take enough Hits for morale checks! Anything can happen... 
[and this is a good point to mention that this simple mechanic adds a lot of fun tension to the game].
The left Cavalry roll '6' - a pass for anyone. The Warriors roll '5' and easily pass [need a '4+] while the right Cavalry just pass with a '3' thanks to being Elite - the slaughter continues!

Meanwhile, the Saxon nobles push right to gain more control of the Hill - the ultimate victory objective.
And the Warriors slam into the open flank of the Cavalry, who REALLY need the melee to end soon!

Meanwhile, back at the road, the Romans take a severe beating from the attack of lights and Warriors.

Turn 6. Cavalry destroy the Warrior Unit they were both fighting, so the left takes on the flanking Warrior Unit fighting the right Cavalry. A Militia unit finally arrives to assist, inflicting three Hits against the top Nobles on the hill but they pass morale and just lose the one additional base.

Turn 7 - things start popping! Romans rout off the field, along with the top Saxon Noble Unit. However one Cavalry is almost wiped out and the other Saxon Nobles are entering the fray, while the Warriors hang in there to the left.

Bottom of Turn 7. Right Cavalry extricate themselves - no rally rules, unfortunately! Left Cavalry grind down the Warriors. Militia take on the Nobles but inflict no Hits while losing a Base themselves - it helps that the Nobles are up hill of the Militia. Still, Victory is up for grabs...
Unfortunately, militia fail morale on a '2' and lose another Base. Cavalry rout the warriors, and are now prepared to charge the flank of the Saxon Nobles on the hill!

Bottom of Turn 8. Militia hang in there while Cavalry inflict severe punishment against the Nobles - they knock off a Base and the Nobles fail morale! They lose another Base. Saxon reinforcements are on the way, and the Militia have an open flank, while the other Cavalry is barely functional with one melee dice of fighting power left!

Saxon Turn 9, their reinforcements crash in, routing the Militia from the field but too late for the Nobles who also flee. The suspense is unbearable! Two Cavalry, one weak, against the Lights and one Warrior Unit - who will master the hill and take home the glory??

Britons Turn 9 - they make their last desperate preparations. One cavalry positions to charge the Archers, the other holds the high ground and awaits the onslaught.

Turn 10. Very disappointing for the Celtic fans. The Archers way beat the odds and the top Cavalry is one Hit away from routing off the field, while the other has fared very poorly against the warriors, losing a base and failing morale while inflicting nearly no Hits of their own!

Turns 11 & Saxon 12. The Saxons hang in their and rout both Cavalry Units. The Warriors did lose a base but passed morale with a '5' and the Archers managed to beat the other Cavalry despite the dice bonus Cavalry get against Lights.
The Warriors beat the Celtics and move on to the finals!!

Whew! This was a great game, and lots of tension. The morale mechanic definitely adds some fun along with the Warband rules. While being a bit clunky at times, and of course suffering from incomplete mechanics, the game was a lot of fun.

I will definitely have to finish off the mechanics, stealing them mostly from my 6D6 medievals, while retaining the feeling that this is a larger scale game. My OHW inspired "Spear to the Strife" is really aimed at the smaller fights that make up 90% of the "battles", while this has a nice feel for the remaining 10% of big battles. I think it'll be worth it. 

As I have a group game coming up, it may be worth it to put this forward for the group - I'll have to playtest it as well as finish more Welsh and Saxons, all by March 30th!