

Covers topics you would expect, but in better detail than you'd think. For a book aimed at tourism, it is actually very good. As a wargame book, it is better than most. With little evidence to work with, Mr. James does a good job coming up with a reasonable hypothesis for where and how the battle was fought. His knowledge and conjecture on the Welsh use of a "longbow" is one place place he ventures into very weak speculation.

Nice pic of the Crug Mawr, "Big Hill" from the Welsh point of view. Seems steeper than discussed in the book, but may just be the camera angle. Anglo-Norman forces deployed on the hill, in the opinion of the author, and the larger Welsh force advanced down the road..

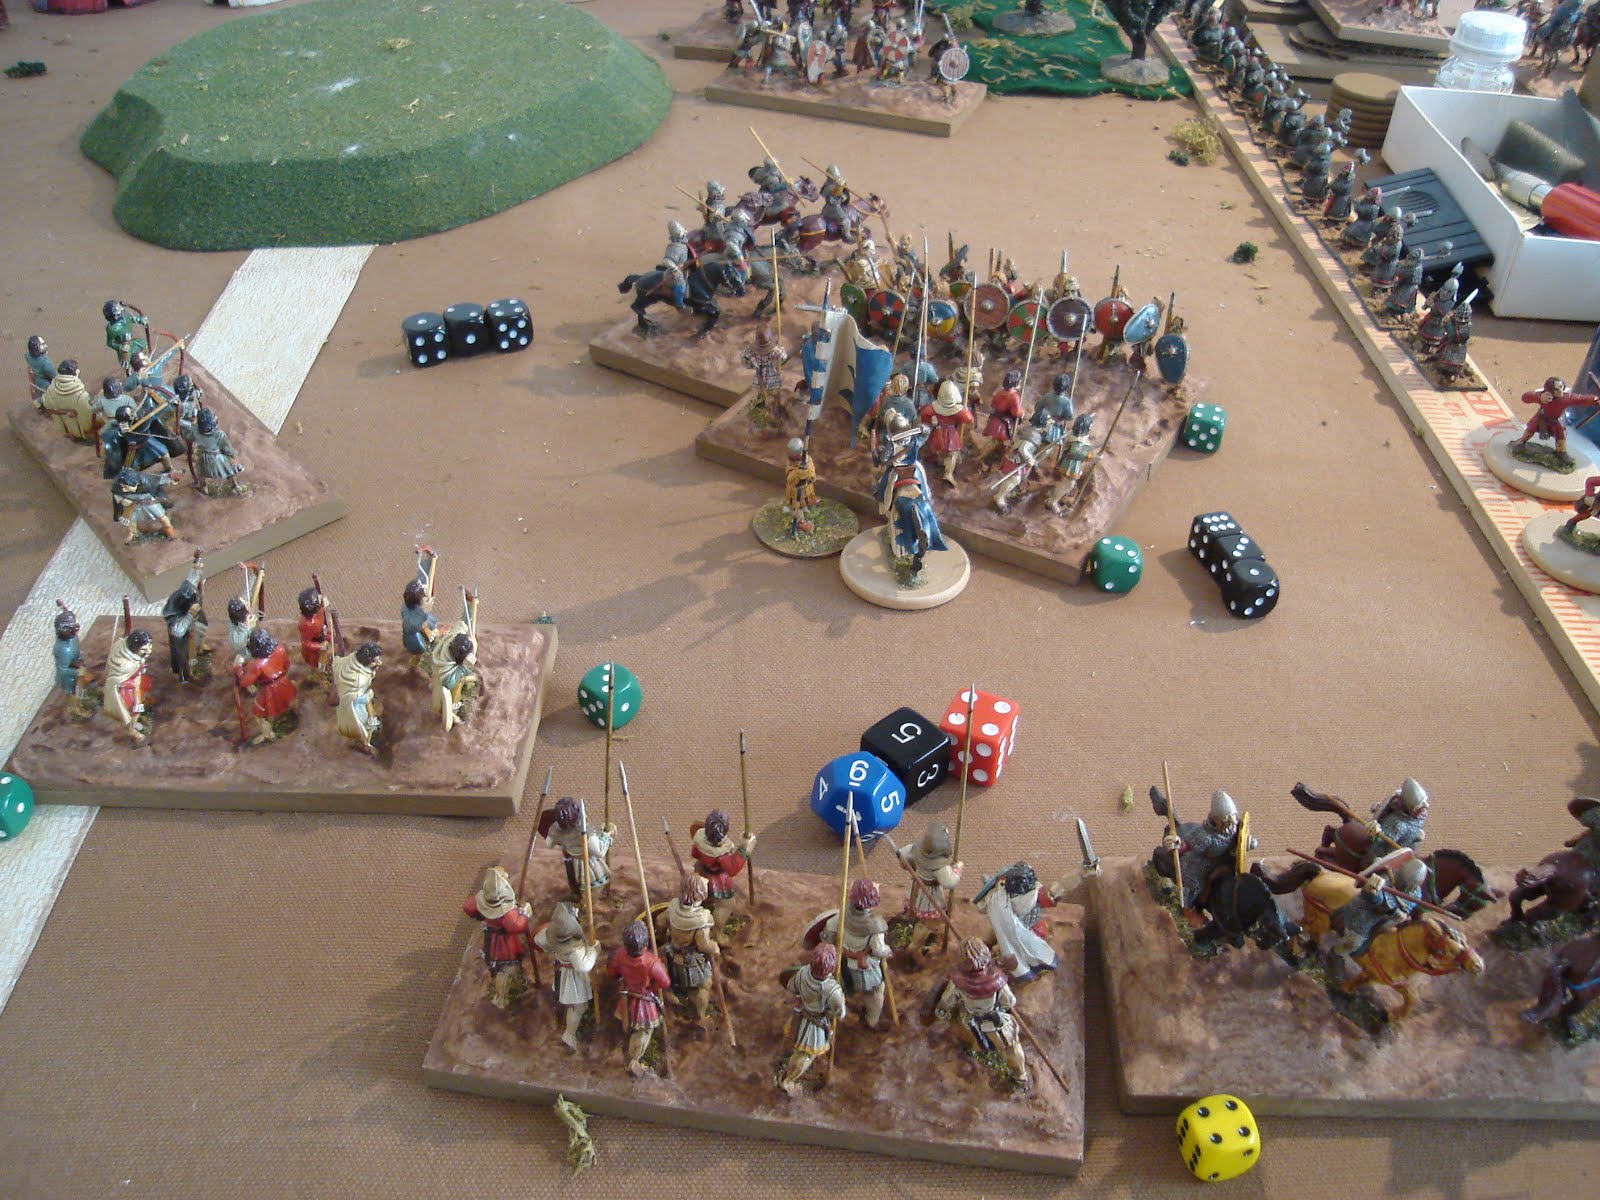
Welsh forces in grey to top right, Anglo-Normans to left of them in white blocks, light grey circle is the Crug Mawr. Mr. James theorizes that the Welsh "longbows" drove off Flemish infantry in front, to which Fitz Martin responded with a knightly charge, that was affected by bowfire enough that it failed and the knights veered off to their right [down in pic] and their retreat precipitated a panicky retreat by the rest of the army in the second image. They retreated back to Cardigan pursued by the victorious Welsh, whereupon the panic resulted in the bridge becoming overloaded and collapsing, with many English drowning.

And now to battle! Below, a small hill representing the summit of Crug Mawr, with the rest of the table being the "gentle" slope towards the Welsh. In retrospect, I should have given FitzMartin an uphill advantage all across the table. Something to try next time.

FitzMartin has a Freeman [OHW Levy], a Knight with FitzMartin and his standard attached, a Flemish Serjeants [OHW Men-at-Arms] and a Bowman [OHW Archers]. Plan is for the Bowmen to soften up the knights charge, who will be supported by the Flemish on the left and Freemen on the Right. Behind them, a monk mans the sacred spring of St. Swiven, praying its healing power bless the wounded.

Note: all types are identical to the OHW rules in their relative values, altho my rules are different in many ways - for one thing, the mechanics are finished up! I also use the 3d6 method and a few other nuances.
Welsh host. Archers of Ceredigion to the front [these rated same as the opposing crossbows, making up any difference in numbers and rate of fire and some possibly more powerful "long bows", perhaps really "longer bows" in the hands of the more skillful].
Behind are two Units of Gwynedd Freemen each flanked by a Unit of Mounted Serjeants [OHW Cavalry], the personal followers or "Teulu" of Owain. They can also throw javelins like light cavalry. To the right is Owain Gwynedd and his standard [a stand-in, of course]. He gives a +1 to Rally attempts with the standard, and has a dice in melee of the same value as the unit to which he's attached. FitzMartin does the same for his side.

Turn 1. Welsh are now properly deployed and have the Initiative [IN]. Their archers proceed to shower the mercenary crossbowmen with arrows [at least they are standing in shade now...] getting 1 Hit and 3 Hits. As one Unit got three Hits in one shot, the crossbows now have a Permanent Hit [yellow]. A PH reduces the number of Hits a Unit may rally off, keeping it closer to the break point of 7.

All Units are canted slightly to the flank to make their movement to battle positions easier. As all Units in this game only get one Turn [which can precede or follow movement], it is better to save the turn for the end of the Move if you are approaching the enemy.
Turn 1 - end. Welsh cavalry move to flanks, with their Freemen moving up to support them, albeit somewhat slower [as Moves are partially diced, one can't always be certain of final positions - this adds welcome friction and tactical challenge to the game]. English take advantage of moving second to shift all their forces right, hoping to gain a local advantage before the two left Welsh Units can re-position. Might work...

Turn 2. Woah! Change that to "should work" as the English seize the IN by beating the Welsh roll by 2 or more! English will now have the first Actions Phase. I see a charge...

...and a general advance. Unfortunately for the English, the Knights roll a bit low, inflicting only two Hits as FitzMartin misses. His infantry rush to support him in his bold venture.

Turn 2 Welsh. Right archers shower the knights with arrows, inflicting three Hits [dice are doubled due to shooting into the Rear Side. Welsh cavalry underperform despite the presence of Owain Himself! Left archers send crossbowmen packing with a little help from the javelins of the left Teulu. The Welsh firepower is 5 Hits from their Army a turn, v. 1.5 Hits a turn from the English, and they are starting to make this advantage felt.

Welsh turn 2 end. The Freemen jump in against the knights, doubtless to help their leader. They put two more Hits on, but don't destroy the knights. Still, this is a good example of the downside of gaining an advantage - the Knights have gotten themselves into trouble by outrunning their supports! But the Welsh shooting makes it hard to sit back instead.

Turn 3, English hold the IN. They fight desperately, the Knights putting 3 Hits [so a PH] on Owain's Teulu, and the Freemen take 2 Hits. Unfortunately, the English Freemen don't make it into contact. Note that there is no flank advantage against these small, somewhat disorderly formations - only a bonus against the Rear Side in shooting and melee.

To no avail. Welsh Turn 3 sees the Knights flee; the Flemings and foot hold the field.

Turn 4, the Welsh seize the IN back! The Flemish are attacked on all sides and showered with arrows [Bowmen can shoot into a melee as long as they have Line of Sight] as the Teulu retreat to rally off some Hits. Anglo-Norman hopes are evaporating quickly...

...and are shattered when the Freemen roll a '1' and can only move 3.5", not enough for contact against the Welsh Freemen! Can it get any worse??

Turn 5, the Flemish rout, surrounded and with arrows sticking out of them like porcupines.

The English Freemen get stuck in, but the combination of Welsh infantry and horse quickly has them fighting against the odds. Still, the dice COULD fail the Welsh!

Turn 6, Owain rides back into the fray, unwilling to accept losses to his professional fighters of Gwynedd. Still, the English are fighting well, and the Welsh...are underperforming, doubtless due to fatigue. Bowmen are now hopelessly out of position.
Finally on Turn 7, the English are not just broken, but handsomely slaughtered as no less than 7 Hits are inflicted on them in one go! The yellow dice should be Red, actually.

Well, this was a tough battle for FitzMartin, but I really thought he had a chance despite his crossbows getting wiped out when he seized the IN. Unfortunately, he outran his supports and the Welsh had thought ahead to have theirs close at hand [typical problem with knights, keeping them supported...]. I was happy to get back into the field with this game and get the Welsh on the table!
Tune in tomorrow for Game 2!
Great battle! I'm off to the battlefield as soon as lockdown ends!
ReplyDeleteBest
Mike
Despertaferres!