
The Dark Ages are a period with tremendous variety - depending on how you set your dates, there is probably more options and armies in it than in more settled, civilized and well-lighted eras. If you don't have a fixation on fielding Rome at its peak of military efficiency, then you are going to very much enjoy yourself.
As for the rules, I've been a Neil Thomas fan for a while - with some qualifications. The main issue is that key mechanics are missing from ALL his rules, and they make important differences to "Table Tactics".
Here, I will differentiate between Battle Tactics and Table Tactics:
- Battle Tactics are what we read about in historical battles, e.g. "the Spartans, having broken the Persian infantry before them, turned and struck the flank of the Persian battle line."
- Table Tactics are what we read about in rule books, e.g. "A unit that has broken the enemy unit to its front, is able to turn a full 90 degrees and strike either enemy unit that is adjacent to it in the enemy battle line."
The question becomes "How does what I read about in the history become a reality on the table top given the game mechanics being used?"
First off, must say that "Ancient and Medieval Wargaming" presents all that you need for a good start in Ancient and Medieval Wargaming. Several sets of rules and lists for the period of each rule set; a core set of mechanics that mostly make sense; a solid platform of designer's notes that explain the way NT takes historical accounts and attempts to get them onto the wargame table. From these, you can finish developing his rules, which is unfortunately needed.
To make a sweeping generalization, it is in development that the vast majority of wargame rules fail. The core mechanics are usually solid but they were not fully playtested and the kinks fixed. Popular British sets seem to epitomize this, but I think it's just because they are popular, not because it is cultural. Still, it is inexcusable that established companies like Warlord, Osprey, Games Workshop, Two Fat Lardies, or Battlefront fail to fully develop rule sets, given the significant resources they have at their disposal. They just don't want to do the hard work, and the customer doesn't punish them for it. Oh wait...I punish them for it!
My battered copy of Ancient and Medieval Warfare by Neil Thomas finally broke its spine, and the Dark Ages rules are now falling out. Still, it is a great book and one worth taking in for new binding. With some effort, an experienced gamer can find a solid set of rules that are playable in a reasonable time and flavorful enough for the periods in the book. They are too loosely written to ever be a competition set, but it is questionable if such sets should exist, really.
To give the rules a solid playtest, as RAW as possible [Rules As Written], I picked the Welsh and Pict lists, for which I had uni-based units of the correct size and numbers. This made the game move along quickly and units handle easily. One thing I've never changed my mind about - putting all my ancient units on single bases! Best thing I ever did! They occupy the same space as 4 Bases of WRG/DBA in a 2x2 lineup.
The only thing I changed is that I switched one Light Infantry bow unit for one "heavy" archer unit, representing some massed archery.
The Armies were composed of:
1 Heavy bow [no save - unarmored and unshielded]
1 Light Infantry bow [also no save]
4 Dark Age Infantry Units [Light Armor], all may use Shieldwall for an amazing 3+ save - the best in the game!
2 Cavalry Units: Elite Heavy Cavalry for Welsh, Average Light Cavalry with Javelins for the Picts.
Aside from the cavalry, the armies were the same and all troops Average.
First, set up the table. I couldn't find any explanation of this, but in the Pict list it says that the army gets two additional woods to put down. I imagine that the Welsh wouldn't want any woods, so the Picts got to put two on the table. I also put down two Hills, one Steep [blocks Line of Sight and gives uphill advantage to a defending unit] and one Gentle [Line of Sight blocking only]. As I put the two hills in diagonally opposite quarters, I put the two woods in the other two quarters.


Interestingly, there has been some compression towards the center, dividing the battlefield up into two main areas: Center and the open Left - the Right is blocked by the woods.
With no explanation, I assumed that the Picts were invading [tattooed scallywags!] and therefore were able to choose their line of advance onto the table. The Welsh ended up opposite. With no explanation, I decided to place four invading Pict units first, followed by four Welsh, then repeat the process. Assumption being that the invader is being watched and his battle line is at least somewhat predictable.
Below, this is a solo game, so I placed the Picts according to an obvious plan, then the Welsh to an obvious counter plan [that I hadn't considered until I saw the Picts deploy].
The Picts place 4 x Dark Ages Infantry in the center - 3 up with 1 reserve. The Welsh place a Light Infantry and DA Infantry on the right, and a Heavy Archer and DA Infantry on the left. The Picts are planning to advance down the center, using the reserve if needed - if the Welsh don't stand against them, they will march Infantry off the board and force a Welsh defeat! The Welsh are planning to take and hold the large steep hill to left and the woods to right, and keep their options open in the center - either Heavy Cavalry or Infantry can deploy there.
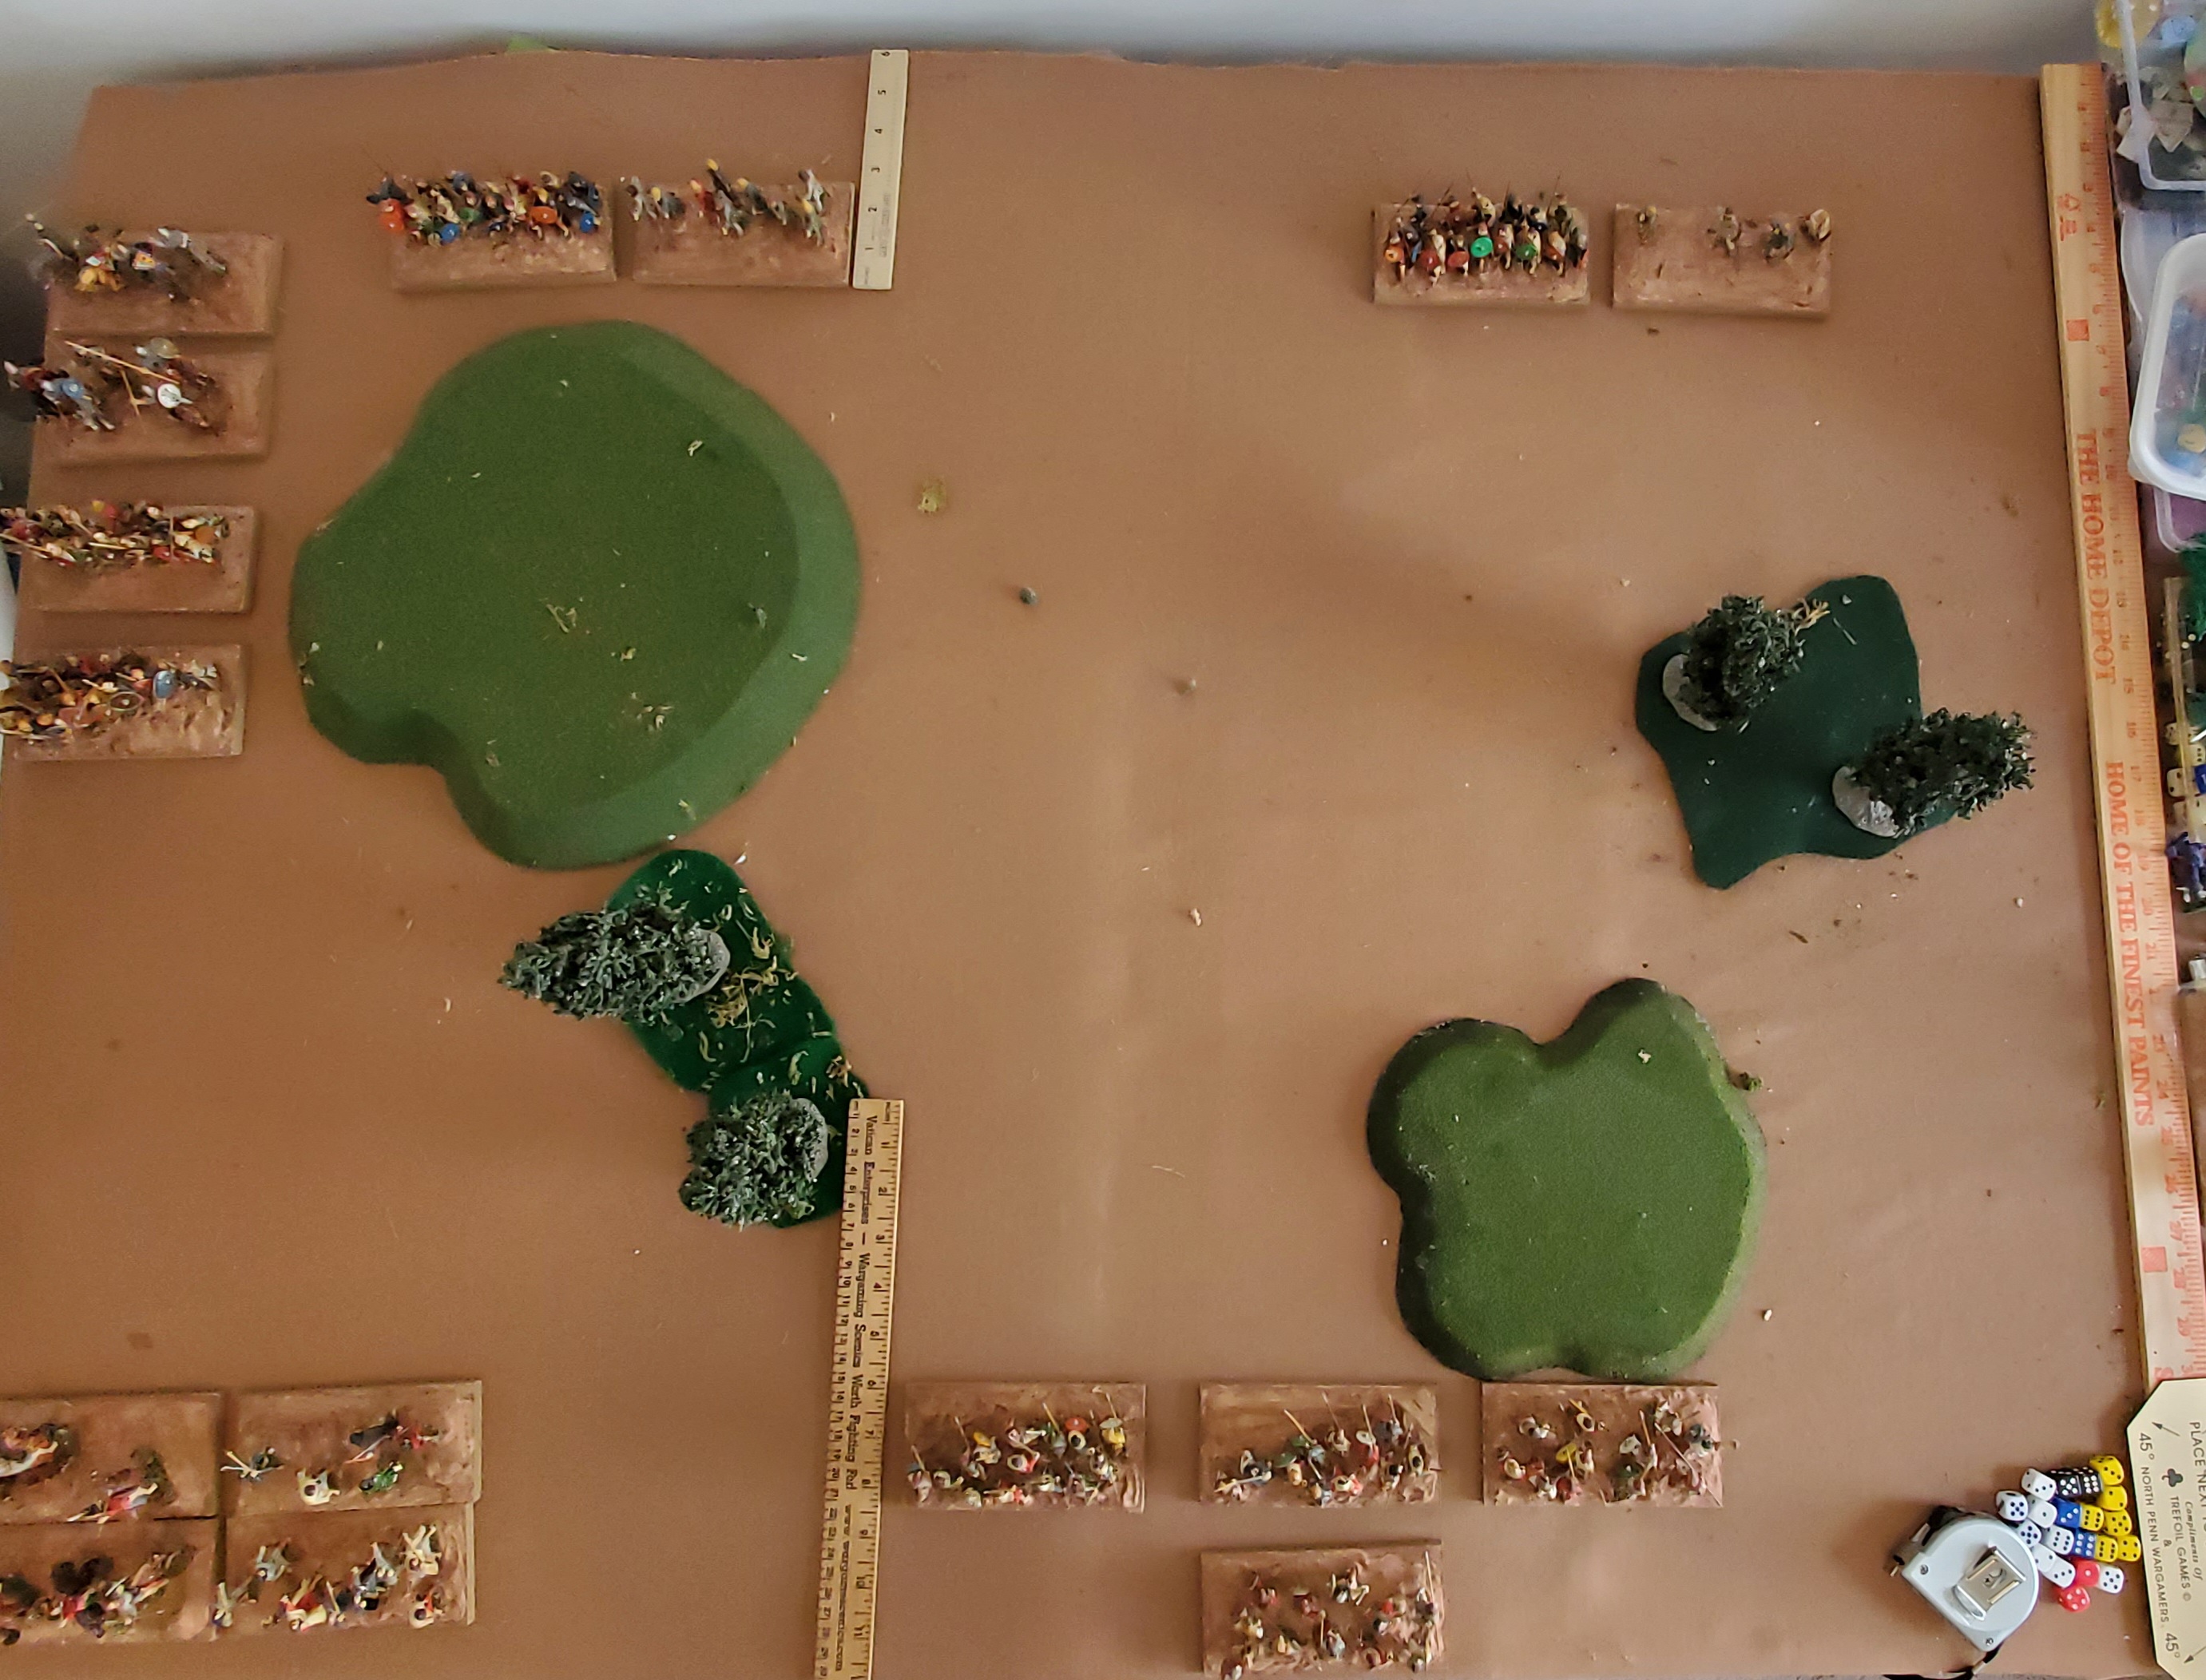
The Picts then finished by putting their heavy archer on the right, their Light Infantry bow on the left, and the two Light Cavalry with Javelins in the only open space remaining, to the left. Plan is to seize / contest both woods for flank security, while using the Light Cavalry to either hold off the Welsh Heavy Cavalry or harass the hill, depending on what the Welsh do.
The Welsh finish by putting two DA Infantry in the center [almost put the cavalry, there, but, they can't beat Dark Ages Infantry in Shieldwall - their save is twice as good, 3+ v. 5+, and their offensive power is equal, 1 die per base] and the Heavy Cavalry to the left in the most open space remaining.

Welsh Battle Line: 2xElite Heavy Cavalry stacked to left. DA Infantry and Heavy Archers next, then three DA Infantry and a Light Infantry Bow last, all Average.

Pict Battle Line: Heavy Archer, four DA Infantry [3 forward, 1 back], Light Infantry bows, two Light Cavalry. All the Picts are Average quality / morale.

The Game begins! It is not explained, so I roll off and the Picts win and take the first Player Turn. The Picts advance as quicky as possible - but DA Infantry only move 3" so it is pretty slow! The Light Infantry move 5". The most maneuverable units are to the left - the Light Cavalry and Light Infantry, all with bows. The Welsh do the same, and advance their Heavy Cavalry as fast as possible to minimize the time shot at by Pict Javelins and Bows - looking for the edge of the board, basically.

Pict Turn 2. Careful measuring, and some math, reveal that Heavy Cavalry will NEVER be able to catch Light Cavalry with a missile weapon, who will ALWAYS be able to shoot at them given the liberal Turning rules - free turns to all Lights [Infantry and Cavalry] which allows them to "float" anywhere and face any direction. Also, all shooting by lights allows movement - Light Cavalry with Javelins can do drive-by shooting, while Bows are a bit more restricted.
 Essentially, this means that the table edges are the main constraint to Light Cavalry. Don't know that I like this amount of freedom, or the way javelins are better than bows [which in reality fire faster, farther, and have a better missile supply than javelins, although they don't hit as hard being lighter missiles].


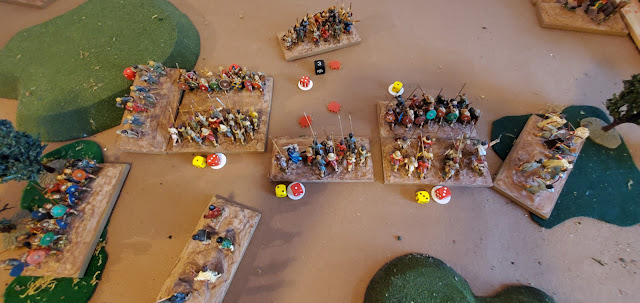
Welsh Turn 2. They advance as fast as possible. The left Heavy Cavalry have already lost one base from Javelin shooting.
 Welsh nobles storm forward with their Teulu against the barbarous Picts!

Turn 3. Picts continue to draw in the Welsh nobles while advancing their center. Here, I make a critical decision! I turn my Pict reserve of a Dark Ages Infantry to the left, to give support to the Light Cavalry. Also, I forgot to roll saves for the Welsh Nobles, who save on a 5+; I roll and they get back a hit apiece.

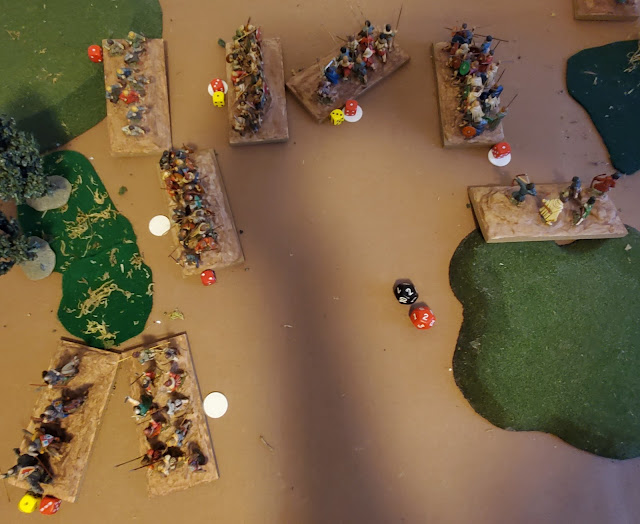
Turn 4. The Pict left is well bent back, while the center advances. One issue is that the Pict Infantry are taking a lot of archery on the left and right. Hadn't noticed that before... still, on the right the Picts have the advantage with a Heavy Archer.
 Closeup of the left - units are getting crowded, and there's no rules about how large a space one needs to maneuver through, i.e. "the Gap Rule".

Turn 5. Decisions are made. The Picts use the confined space to fight one Heavy Cavalry, which rolls quite well, saving two Hits on a '6' while inflicting a hit. In the center, casualties are taken on the left and right Pict DA Infantry, which form Shield Wall to take their save from 6+ to 3+...quite a change!
 yeah...how about those amazing Pict saving rolls! Still, they failed morale and are now at 50% combat effective, but the Heavy Cavalry are close to the same.

Pict Turn 6. Their Light Cavalry save 2 of 3 Hits!
 Welsh Turn 6. The Elite Heavy Cavalry inflict three Hits [average roll]...
 Picts save none and lose another base, then fail their Morale Check [needed 4+]...
 ...and lose another Base, which makes them disappear.

Meanwhile in the main battle line, the Picts are taking significant losses from archery - about a base apiece on either flank. In return, their Heavy Archer has inflicted a Base loss against the Light Infantry in the woods. All the Infantry are in Shieldwall, and the Welsh are not advancing since they have a missile advantage.
 On the left, the Welsh are pushing a Dark Age Infantry slowly into the woods - they intend to deprive the Pict Light Infantry of its benefits and secure their own flank.


One question is - should Heavy Cavalry have triple the combat power of Light Cavalry in melee? Or should it be only double, with the lights maneuverability toned down a bit?

Meanwhile, the Picts charge their last Light Cavalry against the Welsh Heavy. They are closely supported by their own Infantry in Shieldwall, and save 2 of 4 Hits!
 They then inflict three hits, only one of which is saved.

Turn 7. Light Cavalry take two Hits, fail morale, and lose another Base - they are now at 50% effective. But the Welsh Heavy Cav is worse off.

Pict Turn 8. After being flanked by Light Infantry bows, the Picts counter with their own flank attack by their Heavy Archers. But overall, the main battle line doesn't look too good! 2 Bases and three Hits lost v. 6 Bases lost for the Picts.

On the left, Picts are skillfully using the woods and tight space to destroy one Heavy Cavalry - their Infantry are almost in range for a Flank Attack.
 Welsh Turn 8. Their flanking Light Infantry are destroyed. The Pict Heavy Archers move quite slowly in the woods, however, and it is hard to tell when they will be able to help the main battle line!

 Welsh Turn 9. Their Heavy Archer is closing on the Pict left, and the Pict Right Infantry is almost destroyed - only the center is doing well. The Pict Light Infantry are forced to engage the Welsh Infantry in the woods to slow them down.

 ...and are destroyed. What will happen with the Pict Infantry charge?

Pict Turn 11. Their Infantry charge, inflict a Hit resulting in a Base Loss, "Elite" Welsh Heavy Cavalry fail Morale Check with a '1' and lose another Base! They are now 25% effective, and not much use.


Welsh Turn 11. Here is where game mechanic problems are clearly seen: both the Picts and the Welsh have defeated a Unit in front of them. Their Units move so slowly, that to fully "turn the corner" and wheel into contact would take about 3 Turns! So how is Contact between Units made? This mechanic is completely undefined. Both Units have a front corner within their 1.5" move, so should they "close the door" [as pictured on the right by the Welsh Unit]...
 ...or just wheel a bit and touch their corner into the enemy flank as seen below by the Pict center Infantry? In this case, I allowed the corner contact to count and be a flank. Made no difference to the Pict Infantry - they finally were destroyed!
 Here, another problem: the rules here allow a "turn to face" by a flanked defender that is not in melee to the front. This results in a significant turn of about 90 degrees, and how should it occur? On the center [as below]? Or keeping one corner "fixed" while turning the 90 degrees to face? Probably the latter.
 Above, Welsh Turn 14 sees Pict Heavy Archer destroyed, a 180 turn by the Welsh Infantry, which then advances against the rear of the victorious Pict Infantry in the center. The Welsh Heavy Cavalry can't be defeated by the Pict Infantry in Shieldwall - they are way too slow. The Pict Light Infantry is making quite a nuisance of itself in the center, but won't be able to affect the battle enough to prevent the defeat of the Picts, 5 Units to 3.


Pict Light Cavalry - heroes of this battle??


Pict Turn 9. The Welsh heavy cavalry are destroyed. Is the battle going their way?


Meanwhile, the Pict Light Cavalry advance, toss Javelins inflicting some Hits, and are closely supported by their Infantry in Shieldwall.
Upon reflection, and computing the odds, the Welsh Heavy Cavalry go for the attack, inflict two Hits for a Base loss, Picts fail morale...


Meanwhile, the center Welsh Infantry loses a Base, fails Morale Check and is destroyed! Will this turn the tide for the Picts??

The Welsh in turn destroy the right-most Pict Infantry, and the left one is down to three Hits but hanging in there with determination.


Overall, a solid miniatures wargame, with some surprising events that nevertheless felt historical and a decisive result. Key events:
1. The Pict Battle Line needed their Infantry reserve which got sent to the left to hold out against cavalry against which it can't make a decisive result.
2. The Welsh plan of using both their bow units against the main Pict Infantry battle line was successful - Light Infantry firepower is a bit high, as good as melee!
3. The Welsh also successfully deprived the Pict Light Infantry of the use of the left woods, altho it took a long time!
4. The Pict Light Cavalry traded space for time, until they ran out of space and the advancing Heavy Cavalry threatened to win the battle. The Picts should have had one Elite Heavy Cavalry also, but I wanted to see the dynamic of two Light Cavalry v. two Heavy Cavalry.
4. The 3+ save for Shieldwall Infantry slowed the resolution of combat to a crawl between two main battle lines of Dark Age Infantry in Shieldwall, so the flanks determined the outcome despite the Pict break-thru in the center.
With all this in mind, here are my thoughts on tweaking rules for my understanding of history, or completing the rules so they are playable:
1. Setting Up the Table. There is no guidance on how to set up the table. There are a number of methods to do this quickly, why aren't they included?
2. Savings Rolls for unarmored, unshielded units? Probably not, unless being "dispersed" should give Light Infantry a 6+ Save. Heavy Archers should have none.
3. Hit difference between Light and Heavy Archers? A Heavy Archer unit is probably two or three times as many people! In the future, Lights will hit on a 5+, Heavy Archers on a 4+, to take into account the larger size of heavy units, and make up for their lack of mobility compared to LI bows.
4.Javelins v. Bows. Javelins are heavier missiles so hit harder than bows; but bows shoot faster and farther, and have more missiles carried. Javelins should reduce your save by 1 and have the before / after move restriction, while bows get the drive-by shooting ability. Same rules, but swapping weapons.
5. Gap Rule. Units can pass through a Gap at least half their width between friendly units [a Base Depth of 2.5" for my units], but only a Gap equal to their frontage [a Base Width of 5" for my units] if there is an enemy unit to pass by. Could be abused, but "heavy" infantry move so slow it shouldn't matter, while cavalry will be able to shelter behind infantry as they did historically - it will also spread out the Infantry, which is to the advantage of a more concentrated attacker.
6. Shieldwall Save. This should be 4+, not 3+ [way too good!].
7. Fatigue. It is possible to totally "miss" inflicting hits on the opposing units - melee could theoretically last forever, or until you can position a unit to flank them and get lots more dice [which could also be misses...]. Ergo, every turn of melee, there should be 1-2 Hits inflicted upon each unit with no save to represent fatigue of the men fighting. Let's start with 1 Hit!
8. Turns. Wheels or on the center? Either for cavalry? And what should a turn cost? Easy variation is 22.5, 45, 90 and 180 degrees. Also, do Turns happen only at the start of a move, or at any time?
9. Combat Dice. Should heavy cav only get 2 dice per base v. Light Cavalry? Should Light Infantry be the same as Light Cavalry?
10. Separate Charge Phase? Probably unneeded...In any case, all missiles should shoot defensively, not just javelins.
11. Contact! A serious lapse in the rules. These rules feel like "Big Battle, Big Units" rules, with fairly ponderous Infantry Units. The usual NT rule of One Unit per Target's Side seems reasonable, stop upon any contact [which means corner contact] and use minimal movement to touch in melee, while occupying the same space as much as possible. Measuring Distance between closest points and turning on the center would solve most problems.
12. Command and Control. Every Unit can move freely every turn, making these armies very maneuverable, more like 17th C. and forward units. I quite like the Armati system of Movement by "Divisions" of units, which feels like a big battle maneuverability issue. As the divisions break apart due to destroyed Units, they become harder to move and the Army Initiative lowers.
13. Push-back in Melee. There is also no "push-back" against Units that lose in melee - and I like the look and feel of that. So they will go back 1" per difference in Hits inflicted. Should the winner then automatically follow up? Probably, but what about a choice?
14. Limit on missile weapon shots? 6 shots [d6]? 15 Turns of shooting seems very generous when even bows rarely carried more than a quiver or two of arrows.
So to summarize, some of the most serious issues with the rules for a new player:
Setup. There's nearly no system for terrain and deployment, and no scenarios or variations. The ones in other games could be used, but one is probably best off with an historical refight.
Mechanics. Critical game mechanics are unexplained - most seriously, how you make contact and on what sides from what angles and what limits are there per target Unit's side? Turns and Gaps also are vague as to when and how they're done.
Playbalance. All armies have 8 units, and some armies are definitely better than others! Not all units are created equal, and there is no format in the rules to make them so - you just have to suck it up with the 8-unit limit. Unlike One-Hour Wargames, these rules play a bit long to switch sides on the spot, say 2 hours minimum.
Overall, these are a set of rules for the experienced gamer who can handle and adjudicate the issues in a friendly way as they arise, noting down the decisions made from game to game as "house rules".