
With another draft of the Dark Ages rules in the offing, and additional fine tuning as well as some interesting mechanics being tried out from the Great Northern War rules from the yahoogroup, I felt it was high time to try another OHW scenario. This scenario is based on Quatre Bras loosely, in that the Red defender has 1/3 of their force securely deployed between impassible obstacles [here, a large wood and a marsh] blocking the road to a strategic crossroads, while the other two thirds march to the rescue. The Blue attacker is attempting to steal a march around the defender's left flank, and crush a portion of the force while seizing the crossroads. Accordingly, Blue has all 6 units, Red has two, with two more entering the fight on Turns 3 and 9. I assure you, the wait between turn 3 and 9 is a long, long time!
As has been my experience the entire time working with Neil Thomas' "One-Hour Wargames" rules, the undefined mechanics are a bit of a problem. It becomes extremely important to understand exactly how Units move in relation to one another and how contact between them occurs, historically and in game terms, to provide a game experience that is a fun balance of history and playability - especially in one hour! I have had to introduce a few rules to make up for both simplicity and a-historic "feel" [I say feel since it is more art than science, whatever some people claim].
For example, the RAW says that Units may turn at the start and/or end of their moves. In essence, this gives them a full move backwards [Turn 180, move full, Turn 180]. While the RAW don't give scale, a 12" archery range means that it is about 10m/inch, so a unit is about 50m wide, or about 50 men wide, by 10 deep. It seems very maneuverable for 500 men on such a scale to move that quickly retrograde. My clarification of the rules lengthened archery to 18", gives the ground scale at 30m/6", and a Unit is 200 foot or 100 mounted / skirmishers, with a time of about 10 min a turn [understanding that about half of it is wasted time].
In any event, below are the pics of the belligerents, sporting their new basing. I doubled the figs and base size, with a higher base [see the preceding posts] and am now pleased with the durability, handling, and posability of the figures. Amazing how satisfying it all is when I decided to just game for myself and not worry about the gaming community and its standards!
Below, my defenders, the Red team of Sir William Marshal, with his standard, and a body of his men at arms - infantry. He adds one Hit per melee while the banner rallies off 1-2 Hits per turn, even in melee. The Infantry halve Hits against them due to their armor, shields and endurance.

Next to them is a Unit of Archers, here modeled as crossbows. They shoot and melee at d5-1 and have three shots. They cannot charge while they still have arrows - bolts, as the case is here. The shot also shows the cardboard I'm using to give the bases some depth and natural slope.

Below are the Blue attackers. Three Units of Knights, again with a bit of pose, the right Unit being in almost a wedge while the others have some dynamic story as well, with all having the same cardboard on the base to give it some undulating slope feel. Best of all, the horses tails and the knights weapons are a lot safer than previously, as nearly nothing overhangs the bases!

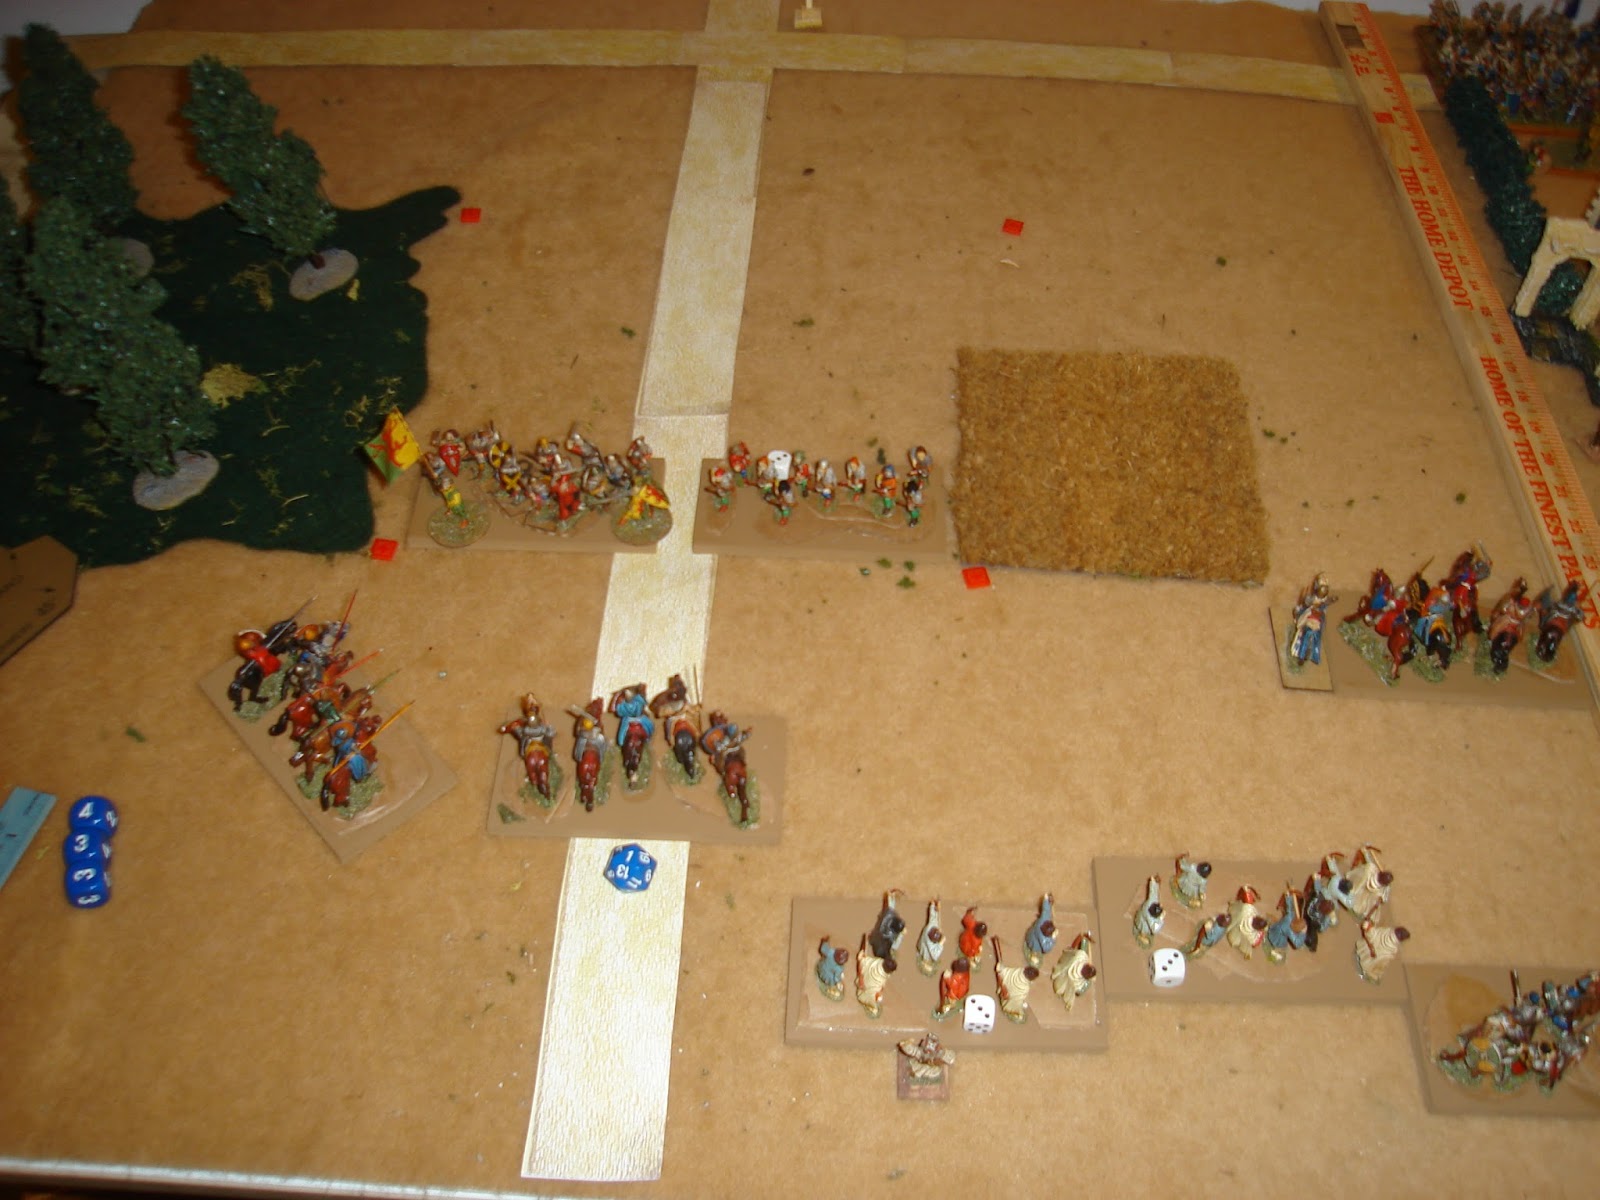
Below are the Welsh archers supporting this marcher lord - each with three shots again shooting and melee is at d5-1. By contrast, the Infantry are d5 and the knights d5+2. Behind you can see the Red starting force blocking the road between the marsh [right] and the woods [left].

Below, the Blue Infantry, well-equipped Swabian figs from Old Glory. The pic doesn't show the basing up well, but they look good with the blue knight on a little height and a soon-to-be standard bearer behind him. Did the conversion today and he's looking great.

Below, the game at end of Blue T1. The Blue knights have advanced close enought to pin the Red force. Red Archers can't charge, so the Infantry are the only attacking option, but they'd be flanked by the other knight unit if they tried it, a sure way for them to be wiped out in 2-3 turns.
This is a good example of mechanics I've felt obligated to introduce - Archers aren't about to charge mounted knights, especially if they've perfectly good bolts to shoot [without return shots]. Also, it seems very "gamey" to me to allow a unit to move very very very close to another unit and "interdict" it by exploiting the movement rules, yet not contact them; I therefore added a rule that you can't close within a Base Depth of another Unit's front unless they are in melee or you are closing to melee them.
Blue Knight 3 works the flank followed up by Blue Infantry, while the 2 Archers are in position and range to shoot next turn in support of the Blue Knight charge on the Red Archers [crossbows].
Red T1. Despite the desperate situation, I decide to shoot with the Archers then follow up with a quick charge by the infantry. If Blue Knight 2 charges into their flank, Red Archers can shoot into it, and they also won't be fighting the weaker Archers who're now holding the road against the entire Blue army! A tough and unexpected choice, but seems worth the risk. Red inflicts 6 total Hits with the Archers and Infantry.

End of T2. Blue charged in support of Knights 1, grabbing the opportunity to take out Red Infantry. After some thinking, this seemed like the right thing to do. Blue Knight 3 works the flank followed by their Infantry. The Archers move up instead of shooting. The combination of Hero and Banner plus Red charging first has resulted in them being in the lead, 11 to 7 in Hits inflicted. This makes it even more important that Blue Knight 2 supported their brothers in arms.

Turn 3. Blue Knights roll up and destroy Red Infantry, taking out the banner and Hero with it. Lucky for Knight 1! Red Knights charge onto the board to support their Lord but it is too late - William Marshal is captured. Red knights are mutually supporting, with Knight 3 on the right protecting Knight 2's flank. The Red Archers must be nervous, but perhaps not? You can just see the Welsh monk has moved over to the badly damaged Knight 1 to help rally them. He permits d5 Hits to be rallied off, but the Unit can't do anything else, not move, nor shoot or melee. Blue's Welsh Archers continue to move in support and save their arrows.

Turn 4. Blue sidled into contact with the Red Archers. I allow a unit a straight d5 move in any direction, which can get into melee contact regardless of frontal arc as long as that front corner can contact an enemy unit - my thinking is when your only about 10-20 meters away, it's easy to get into contact in any direction. These aren't rigid formations but more like "blobs" of soldiers.
Blue Knight 3 also charges up, with their Infantry moving around the flank. Welsh archers shoot in support of the attacks. Red retaliates with a risky charge through the gap that nearly destroys Blue Knights 2 with the Archer's limited melee support! But at 14 Hits they're still in the fight, so "close, but not good enough". Blue Knight 1 now charges into support Knights 2 while the mercenary Crossbows struggle to survive.
Blue Knight 3 also charges up, with their Infantry moving around the flank. Welsh archers shoot in support of the attacks. Red retaliates with a risky charge through the gap that nearly destroys Blue Knights 2 with the Archer's limited melee support! But at 14 Hits they're still in the fight, so "close, but not good enough". Blue Knight 1 now charges into support Knights 2 while the mercenary Crossbows struggle to survive.

End of T5. Blue Knight 2 falls, while Red crossbows [Archers] survive. Maybe Red Knight 2's charge wasn't in vain? Still, they've taken a lot of Hits...Welsh shoot a volley in support of Blue Knight 3.

End T6. Red resistance collapses with the death of Red Knight 2 and the crossbows, AND Red Knight 3. With no force on the board, a rallying personality and time to prepare defenses against the Red forces arriving from the left board edge road on T9, Red has to concede.
I probably should've played more conservative with Red Knight 2, but was hoping to extricate the crossbows while destroying Blue Knight 2 and holding off Blue Knight 1 - remember, they can't rally Hits using the monk while in melee.
I probably should've played more conservative with Red Knight 2, but was hoping to extricate the crossbows while destroying Blue Knight 2 and holding off Blue Knight 1 - remember, they can't rally Hits using the monk while in melee.

I played the scenario about seven times, first with a Welsh force against a Knight force, and then with identical medieval knight forces. The Welsh cavalry has a lot less punch, being armed with javelins and not being knights. Still, their mobility is crucial to pinning down the Red blocking force. While it was tricky, and closer to fight with the Welsh, I still felt that they could do it unless they made an error.
While it is easy to lose as the Blue attacker, it is still essentially Blue's to lose. The key here is the mechanics of the game become extremely important. It is a close run thing to pin the two initial defending units in place. Failure to do so has them immediately retreating down the road to the strategic crossroads and closer to reinforcements on T3. While this also places them in the danger zone of any fast moving attackers who are moving down the open - if narrow - corridor to the right of the marsh, it is still preferable to being run over by the entire Blue force! The first several times I played it, I knew I'd lost it for Blue within a few turns about half the time. However, once I'd gotten it figure out, I won it three times straight for Blue with no bright ideas for Red coming to mind.
Several small but important rules clarifications came about. It's only reasonable that not only can LoS be drawn from the center of a Unit, but that >half the base side is unobstructed. Units can't get closer than 2.5" to a Unit's front unless it is in melee or they melee it. This prevented "gamey" blocking maneuvers that make a big difference in a maneuver scenario. I also clarified and simplified the "Initiative Move" of 1d5 in any direction, with no corner of the Base moving > than the amount rolled. This can be a move to contact with a front side or corner as usual, regardless of frontal arc. This came up and worked well.
A few of the battles I tried different combat resolution methods, but they just added more work counting dice and didn't add much while saving the "1/2 Hits rolled up" for Armor, I don't find the math hard so returned to my usual system.
I also tried using the d6 again, and I even played once with only the RAW! Interestingly, got the same result with only a couple of things that were too predictable, but I enjoy the friction of rolling dice for movement and using the d5 instead of the d6 for combat. I do feel that the 2-5 roll with doubles on 3 and 4 makes for a more comfortable bell curve effect. It's also more emotionally satisfying than rolling the occasional '1'!
I also tried using the d6 again, and I even played once with only the RAW! Interestingly, got the same result with only a couple of things that were too predictable, but I enjoy the friction of rolling dice for movement and using the d5 instead of the d6 for combat. I do feel that the 2-5 roll with doubles on 3 and 4 makes for a more comfortable bell curve effect. It's also more emotionally satisfying than rolling the occasional '1'!
Will clean up and post the rules anew soon. Meanwhile, happy to have enjoyed several games in about an hour or even a half hour at times. It's a simple, interesting system with just a little tweaking and rules clarifying that makes for a satisfying game with good feel, getting one "there" with only a small fraction of the rules muddling of a more complicated set, yet still leaving lots of interesting tactical decisions in place.
I'm keeping with the 3x3' table as it fits perfectly onto an old IKEA folding table with about 1' to spare on the side to keep things handy like rulers. You can actually see the yardstick I use to track the table on the right.
ReplyDeleteI'm using 5x2.5 b/c I like the "rules synergy" of having a depth that is half the width, which is also how humans are sorta shaped. The original floor tile samples are 5x3" so if you want free bases that are tall you are set! the extra 1/2" depth will also give you both more protection for the figures and more space to make dioramas, my latest basing interests. Cheers, a.